Installing NextCloud Hub with OnlyOffice on Ubuntu 18.04


Update 2023-06-14: Here's a new tutorial for Ubuntu 22.04! Consider this older tutorial obsolete (but possibly helpful for people with older systems?)
I have previously provided an in-depth explanation about NextCloud with Collabora Office Online and how we've installed it on Ubuntu 16.04. This is an update both of the process, and of the technology. NextCloud is leaping from strength to strength, and seems to be benefiting from the well-founded concern held by many in the EU about data sovereignty and the market domination (and exploitation) of US-based multinationals like Amazon, Google, Microsoft, Dropbox, and others. As a collaborative, web-based front end to LibreOffice, Collabora shows great potential... but it's not anywhere near the capabilities of Google Docs...
The same, however, is not true of a relatively new entry into the web-based collaborative productivity application space: OnlyOffice. The application itself (for the tech focused reader, they've built an entirely new application ecosystem primarily using modern Javascript frameworks) is impressive in both capabilities and polish. The only real caveat I've come across is that it uses, by default, the fauxpen standard formats developed by Microsoft rather than the true open standard formats of OpenDocumentFormat. But in a world where, sadly, most people don't even know what a file format is, any software that doesn't read and write the incumbent monopolist's format with great fidelity is dead in the water. On that count, OnlyOffice is impressive.
NextCloud and OnlyOffice - even better together!
The beauty of the open source software model is that we can connect complementary applications, like NextCloud and OnlyOffice - developed by completely separate communities - to create a tightly integrated, highly functional, diverse computing platform. This combination, along with a bunch of other NextCloud "apps", is the equal of something like Google Apps (which includes Google Docs and Google Drive), but is under your control, not Google's. To me, that's a crucial difference.
With the release of NextCloud 18.0.1, NextCloud has bundled OnlyOffice with it, creating something called "NextCloud Hub". It's pretty impressive. That's what we're setting up here!
Setting up your own NextCloud Hub!
Yes, NextCloud and OnlyOffice servers on the same host.
If you're game to run your own (and, in my experience, it's a surprisingly well behaved system) here's how you do it.
In preparation, you'll want to have the following ready:
- a Linux virtual machine or "VM" (I recommend running the current Ubuntu LTS version, or current Debian) with an external IP address and a user with sudo privileges - more info on that...,
- your domain name for the NextCloud instance, pointing to the IP address of your VM,
- credentials for an email address capable of sending from a remote server (usually termed an "authenticating SMTP email account")
Please note: the images accompanying this howto have been pulled from several different NextCloud and OnlyOffices I maintain.
Secure access with SSH
First things first, make sure you're logged into your host (probably via SSH) as a user who has "sudo" capabilities! You need to log into the host from your local machine. We recommend setting up key-based authentication.
Firewall with UFW
No computer system is ever full secure - there're always exploits waiting to be found, so security is a process of maintaining vigilance. Part of that is reducing exposure - minimising your "attack surface". Use a firewall - "ufw" is installed on Ubuntu by default. Make sure you've got exceptions for SSH (without them, you could lock yourself out of your machine! Doh!).
Run the following commands to allow your Docker containers to talk to other services on your host.
sudo ufw allow in on docker0

sudo ufw allow from 172.0.0.0/8 to any
Specifically for Docker's benefit, you need to tweak the default Forwarding rule (I use "vim" as my editor. If you don't know how to/want to use it, replace vim with nano everywhere you see it in the following - nano's easier to use for simple edits like this):
sudo vim /etc/default/ufw
and duplicate (copy and paste it) the line DEFAULT_FORWARD_POLICY="DROP" tweak it to look like this (commenting out the default, but leaving it there for future reference, so you know what you've changed!):
#DEFAULT_FORWARD_POLICY="DROP"

DEFAULT_FORWARD_POLICY="ACCEPT"
You also have to edit /etc/ufw/sysctl.conf and remove the "#" at the start of the following lines, so they look like this:
sudo vim /etc/ufw/sysctl.conf
# Uncomment this to allow this host to route packets between interfaces

net/ipv4/ip_forward=1

net/ipv6/conf/default/forwarding=1

net/ipv6/conf/all/forwarding=1
and finally restart the network stack and ufw on your server
sudo service networking restart

sudo service ufw restart
Installing the Nginx webserver
In the configuration I'm describing here, you'll need a webserver running on the server - it'll be acting as a "proxy" for the Docker-based Nginx instance described below. I like the efficiency of Nginx and clarity of Nginx configurations over those of Apache and other open source web servers. Here's how you install it.
sudo apt-get install nginx-full
To allow nginx to be visible via ports 80 and 443, run
sudo ufw allow "Nginx Full"
Note: make sure your hosting service is not blocking these ports at some outer layer (depending on who's providing that hosting service you may have to set up port forwarding).
Installing MariaDB
MariaDB is effectively a drop-in alternative to MySQL and we prefer it because it's not controlled by Oracle and has a more active developer community. On Ubuntu, MariaDB pretends to be MySQL for compatibility purposes, so don't be weirded out by the interchangeable names below. Install the server and the client like this.
sudo apt-get install mariadb-server-10.0 mariadb-client-10.0
You need to set a root (admin) user password - you might want to create a /root/.my.cnf file containing the following (replacing YOURPASSWORD) to let you access MariaDB without a password from the commandline:
[client]

user=root

password=YOURPASSWORD
You should now be able to type "mysql" at the command prompt
Tweak the configuration so that it's listening on
sudo vim /etc/mysql/mariadb.conf.d/50-server.cnf
and copy the bind-address line and adjust so it looks like this - we want MariaDB to be listening on all interfaces, not just localhost (127.0.0.1)...
# Instead of skip-networking the default is now to listen only on

# localhost which is more compatible and is not less secure.

#bind-address           = 127.0.0.1

bind-address            = 0.0.0.0
Then restart MariaDB:
sudo service mysql restart
It should now be listening on port 3306 on all interfaces, i.e. 0.0.0.0.
Now set up the database which will hold NextCloud's data. Log into the MySQL client on the host (if you've created a .my.cnf file in your home directory as describe above, you won't need to enter your username and password):
mysql -u root -p
Enter your root password when prompted. It's also a good idea to gin up a password for your "nextcloud" database user. I usually use pwgen (sudo apt-get install pwgen) - for example running this command will give you a single 19 character password without special characters (just numbers and letters):
pwgen -s 19 1
Giving you something like this (but if it's truly random, almost certainly not exactly this):
bYIOSrvR9aGwL5FRGFU
At the prompt (which will look something like MariaDB [(none)]>) enter the following lines (putting your password in place of [passwd]):
CREATE DATABASE nextcloud CHARACTER SET utf8mb4 COLLATE utf8mb4_unicode_ci;

CREATE USER "nextcloud"@"%" IDENTIFIED BY "[passwd]";

GRANT ALL ON nextcloud.* to "nextcloud"@"%";

FLUSH PRIVILEGES;
Then enter \q to exit.
Prepare your Docker Compose host
We make use of the NextCloud community's stable Docker container which they keep up to date. Similarly, the OnlyOffice developers maintain a Docker container, too. We will run them both on this same server as separate services via Docker Compose. The two sets of Docker containers will look like this:
- a suite of NextCloud containers:
- the main PHP-FPM container (which provides most of the functionality for NextCloud using the PHP scripting engine,
- an identical container to the PHP one which runs the cron service (which does periodic administrative tasks relevant to NextCloud)
- a Redis container (which provides performance improving caching for NextCloud), and
- an Nginx webserver container which makes it easier to manage the configuration and paths of the NextCloud instance. It means that on the hosting server, we only need to run a proxying web server, which is easy.
- the single OnlyOffice container which, despite the Docker convention of each container running only a single services, runs the whole OnlyOffice stack, which includes PostgreSQL, Nginx, Rabbit-MQ, Python, and NodeJS.
The way I prefer to implement this set of containers is to use:
sudo apt-get install docker-compose
to set up the entire Docker and Docker Compose system on your server.
Then set up a place for your Docker containers (replace "me" with your non-root username on the server) and the associated persistent data (your Docker containers should hold no important data - you should be able to delete and recreate them entirely without losing any important data or configuration):
sudo mkdir /home/data
sudo mkdir /home/data/nextcloud

sudo mkdir /home/data/nextcloud-nginx

sudo mkdir /home/data/nextcloud-redis
sudo mkdir /home/data/onlyoffice
sudo mkdir /home/docker

sudo mkdir /home/docker/nextcloud
sudo chown -R me:me /home/docker
NextCloud Install
First, let's set up NextCloud (this also installs the OnlyOffice server):
cd /home/docker/nextcloud
Here's an example of the required docker-compose.yml file (you can create this via a text editor like "nano" which should be pre-installed on any VM these days (or use my preferred, but less intuitive, editor, vim) nano docker-compose.yml in the /home/docker/nextcloud directory):
version: '3'

services:

  nginx:

    container_name: nginx-server

    image: nginx

    ports:

      - 127.0.0.1:8082:80

    volumes:

      - /home/data/nextcloud-nginx/nginx/nginx.conf:/etc/nginx/nginx.conf:ro

      - /home/data/nextcloud:/var/www/html

    links:

      - app

    environment:

      - VIRTUAL_HOST

    restart: unless-stopped

  app:

    container_name: app-server

    image: nextcloud:fpm

    stdin_open: true

    tty: true

    links:

      - redis

    expose:

      - '80'

      - '9000'

    volumes:

      - /home/data/nextcloud:/var/www/html

    restart: unless-stopped

  cron:

    image: nextcloud:fpm

    volumes:

      - /home/data/nextcloud:/var/www/html

    user: www-data

    entrypoint: |

      bash -c 'bash -s <<EOF

      trap "break;exit" SIGHUP SIGINT SIGTERM

      while /bin/true; do

        /usr/local/bin/php /var/www/html/cron.php

        sleep 900

      done

      EOF'

    restart: unless-stopped

  redis:

    image: redis:alpine

    volumes:

      - /home/data/nextcloud-redis:/data

    restart: unless-stopped

  onlyoffice-document-server:

    container_name: onlyoffice-document-server

    image: onlyoffice/documentserver:latest

    stdin_open: true

    tty: true

    restart: unless-stopped

    expose:

      - '80'

      - '443'

    volumes:

      - /home/data/onlyoffice/data:/var/www/onlyoffice/Data

      - /home/data/onlyoffice/log:/var/log/onlyoffice
The "port" specified above, 8082 for nginx is arbitrary - I picked it to ensure it doesn't don't conflict with ports being used by other containers on my server - you can use these if you want, or use sudo netstat -punta to see what ports are currently claimed by other services on your server (if there are any) and pick one that doesn't clash! If it scroll past too fast, you can pipe it into less to allow you to scroll and search like this: sudo netstat -punta | less - hit "q" to exit or "/" to initiate a text search.
You will also need to provide the "nginx.conf" file referenced in the nginx section of the file. Do that by using your editor, e.g. nano nginx.conf, and enter this content (you shouldn't need to alter anything):
user www-data;
worker_processes 1;
error_log  /var/log/nginx/error.log warn;

pid        /var/run/nginx.pid;
events {

    worker_connections  1024;

}
http {

    upstream backend {

        server app-server:9000;

    }
    include       /etc/nginx/mime.types;

    default_type  application/octet-stream;
    log_format  main  '$remote_addr - $remote_user [$time_local] "$request" '

                      '$status $body_bytes_sent "$http_referer" '

                      '"$http_user_agent" "$http_x_forwarded_for"';
access_log /var/log/nginx/access.log main;
    sendfile        on;

    #tcp_nopush     on;
keepalive_timeout 65;
    map $http_host $this_host {

        "" $host;

        default $http_host;

    }
    map $http_x_forwarded_proto $the_scheme {

        default $http_x_forwarded_proto;

        "" $scheme;

    }
    map $http_x_forwarded_host $the_host {

        default $http_x_forwarded_host;

        "" $this_host;

    }
    server {

        listen 80;
        # Add headers to serve security related headers

        add_header Strict-Transport-Security "max-age=15768000; includeSubDomains; preload;";

        add_header X-Content-Type-Options nosniff;

        add_header X-XSS-Protection "1; mode=block";

        add_header X-Robots-Tag none;

        add_header X-Download-Options noopen;

        add_header X-Permitted-Cross-Domain-Policies none;
        root /var/www/html;

        client_max_body_size 10G; # 0=unlimited - set max upload size

        fastcgi_buffers 64 4K;
gzip off;
        index index.php;

        error_page 403 /core/templates/403.php;

        error_page 404 /core/templates/404.php;
        rewrite ^/.well-known/carddav /remote.php/dav/ permanent;

        rewrite ^/.well-known/caldav /remote.php/dav/ permanent;
        location = /robots.txt {

            allow all;

            log_not_found off;

            access_log off;

        }
        location ~ ^/(build|tests|config|lib|3rdparty|templates|data)/ {

            deny all;

        }
        location ~ ^/(?:\.|autotest|occ|issue|indie|db_|console) {

            deny all;

        }
        location / {

            rewrite ^/remote/(.*) /remote.php last;

            rewrite ^(/core/doc/[^\/]+/)$ $1/index.html;

            try_files $uri $uri/ =404;

        }
        location ~* ^/ds-vpath/ {

            rewrite /ds-vpath/(.*) /$1  break;

            proxy_pass http://onlyoffice-document-server;

            proxy_redirect     off;
client_max_body_size 100m;
            proxy_http_version 1.1;

            proxy_set_header Upgrade $http_upgrade;

            proxy_set_header Connection "upgrade";
            proxy_set_header Host $http_host;

            proxy_set_header X-Real-IP $remote_addr;

            proxy_set_header X-Forwarded-For $proxy_add_x_forwarded_for;

            proxy_set_header X-Forwarded-Host $the_host/ds-vpath;

            proxy_set_header X-Forwarded-Proto $the_scheme;

            #proxy_set_header X-Forwarded-Proto 'https';

        }
        location ~ \.php(?:$|/) {

            fastcgi_split_path_info ^(.+\.php)(/.+)$;

            include fastcgi_params;

            fastcgi_param SCRIPT_FILENAME $document_root$fastcgi_script_name;

            fastcgi_param PATH_INFO $fastcgi_path_info;

            fastcgi_param HTTPS off;

            fastcgi_param modHeadersAvailable true; #Avoid sending the security headers twice

            fastcgi_pass backend;

            fastcgi_intercept_errors on;

        }
        # Adding the cache control header for js and css files

        # Make sure it is BELOW the location ~ \.php(?:$|/) { block

        location ~* \.(?:css|js)$ {

            add_header Cache-Control "public, max-age=7200";

            # Add headers to serve security related headers

            add_header Strict-Transport-Security "max-age=15768000; includeSubDomains; preload;";

            add_header X-Content-Type-Options nosniff;

            add_header X-Frame-Options "SAMEORIGIN";

            add_header X-XSS-Protection "1; mode=block";

            add_header X-Robots-Tag none;

            add_header X-Download-Options noopen;

            add_header X-Permitted-Cross-Domain-Policies none;

            # Optional: Don't log access to assets

            access_log off;

        }
        # Optional: Don't log access to other assets

        location ~* \.(?:jpg|jpeg|gif|bmp|ico|png|swf)$ {

            access_log off;

        }
    }

}
That should be all the configuration you need to make the Docker containers go.
Configuring Nginx to proxy NextCloud and OnlyOffice
The next step is configuring the local nginx proxy servers for NextCloud and OnlyOffice using the nginx instance you installed earlier. That's what responds to the domain name you choose for this service. In our case, the name is https://docs.oeru.org - you can have a look at it to see what you should be seeing when you first start things up! We use Let's Encrypt to provide secure hosting - here're my Let's Encrypt instructions on setting it up. The key thing to realise is that your "certificates" need to exist for Nginx to restart with the new configurations below - use the "commenting out the intervening lines" trick mentioned in my instructions to bootstrap the creation of your secure certificates!
To configure the proxy, you need to create this configuration file in your /etc/nginx/sites-available/ directory.
NextCloud Proxy Configuration
Create a file with a meaningful name for your NextCloud Proxy, perhaps based on the domain name you've chosen (our file for docs.oeru.org is called "docs") using the same editing approach as the last few (although this is in a different directory) for example sudo nano /etc/nginx/sites-available/nextcloud with the following contents, replacing [nextcloud.domain] with your selected domain name, but leave off the [ ] (those are just there to make sure nginx errors if you've missed replacing any) - and the port number 8082 if you've opted to change to a different one!:
server {

    listen 80;

    listen [::]:80;

    server_name [nextcloud.domain];
include includes/letsencrypt.conf;
    # enforce https

    location / {

        return 302 https://$server_name$request_uri;

    }

}
server {

    listen 443 ssl;

    listen [::]:443 ssl;

    #listen 127.0.0.1:443 ssl;
server_name [nextcloud.domain];
    ## Access and error logs.

    access_log /var/log/nginx/[nextcloud.domain]_access.log;

    error_log /var/log/nginx/[nextcloud.domain]_error.log;
    ssl_certificate /etc/letsencrypt/live/[nextcloud.domain]/fullchain.pem;

    ssl_certificate_key /etc/letsencrypt/live/[nextcloud.domain]/privkey.pem;
    ssl on;

    # from http://axiacore.com/blog/enable-perfect-forward-secrecy-nginx/

    ssl_session_cache shared:SSL:10m;

    ssl_session_timeout  10m;

    # limit_req_zone $binary_remote_addr zone=one:10m rate=1r/s;

    # forward secrecy settings

    ssl_protocols TLSv1 TLSv1.1 TLSv1.2;

    ssl_prefer_server_ciphers on;

    ssl_ciphers "EECDH+ECDSA+AESGCM EECDH+aRSA+AESGCM EECDH+ECDSA+SHA384 EECDH+ECDSA+SHA256 EECDH+aRSA+SHA384 EECDH+aRSA+SHA256 EECDH+aRSA+RC4 EECDH EDH+aRSA RC4 !aNULL !eNULL !LOW !3DES !MD5 !EXP !PSK !SRP !DSS !RC4";

    ssl_dhparam /etc/ssl/certs/dhparam.pem;
    #location = /robots.txt {

    #    allow all;

    #    log_not_found off;

    #    access_log off;

    #}
    # The following 2 rules are only needed for the user_webfinger app.

    # Uncomment it if you're planning to use this app.

    rewrite ^/.well-known/host-meta /public.php?service=host-meta last;

    rewrite ^/.well-known/host-meta.json /public.php?service=host-meta-json last;
    # The following rule is only needed for the Social app.

    # Uncomment it if you're planning to use this app.

    rewrite ^/.well-known/webfinger /public.php?service=webfinger last;
    location ^~ / {

        proxy_pass http://127.0.0.1:8082;

        proxy_set_header Upgrade $http_upgrade;

        proxy_set_header Connection "Upgrade";

        proxy_set_header Host $http_host;

        proxy_read_timeout 36000s;

        proxy_buffering off;

        proxy_max_temp_file_size 15000m;

    }

    client_max_body_size 1G;

    fastcgi_buffers 64 4K;

    add_header Strict-Transport-Security "max-age=31536000; includeSubdomains;";

    # Remove X-Powered-By, which is an information leak

    fastcgi_hide_header X-Powered-By;

}
Note: you'll need to create the file cited in the proxy configration: /etc/ssl/certs/dhparam.pem
You can do this as follows (install the necessary software, backup any possible existing version as a matter of prudence, and create a new one):
sudo apt update && sudo apt install openssl.bak
sudo [ -f "/etc/ssl/certs/dhparam.pem" ] && sudo mv /etc/ssl/certs/dhparam.pem /etc/ssl/certs/dhparam.pem
sudo openssl dhparam -out /etc/ssl/certs/dhparam.pem 2048
Once those are created, you have to make sure that they're "enabled" (replacing with your file names, of course):
sudo cd /etc/nginx/sites-enabled

sudo ln -sf ../sites-available/nextcloud .
To confirm that there aren't any typos or issues that might make nginx unhappy, run
sudo nginx -t
If all's well, get nginx to reread its configuration with the new files (if not, it might be because you missed replacing one of the [tokens]):
sudo service nginx reload
Firing up your NextCloud!
Phew - congratulations on getting here! We've reached the moment of truth where we need to see if this whole thing will work!
We need to make sure we're back in the NextCloud Docker directory we set up:
cd /home/docker/nextcloud
and then we need to try running our docker-compose script to "pull" in the pre-built Docker containers we've specified in our docker-compose.yml file:
docker-compose pull
All going well, after a few minutes (longer or shorter depending on the speed of your server's connection) you should have download the Nginx, Redis, and NextCloud Docker images. Then you can run:
docker-compose up -d && docker-compose logs -f
This will attempt to start up the containers (bringing them "up" in daemon mode, thus the -d) and then show you a stream of log messages from the containers, preceded by the container name. This should help you debug any problems that occur during the process (ideally, none).
Once you see log messages streaming past, and no obvious "container exited" or other error messages (which will usually contain the word "error" a lot), you should be able to point your browser at your selected domain name and bring it up in your browser! Just point your web browser at https://nextcloud.domain (replacing with your domain, of course - the https assumes you've got your Let's Encrypt certificate set up - I recommend doing that first).
Configuring database access
On doing so, if all is well, you should be directed through the database set up process for your NextCloud instance. Your details should be:
database IP: 172.17.0.1 - this is the default IP of the Docker host server.
database name: nextcloud
database user: nextcloud
database password: (the one you came up with above)
Configuring the Admin user
Once that's set and working, NextCloud will install all the relevant database tables and initial data. You'll be asked to set up an admin user account, which can be "admin" (you could make it something different to help stymie nefarious probes that assume you've got a user called "admin" - but don't forget what you've called it!) and some strong password you create (you can use the pwgen utility you used earlier) - I'd recommend recording it somewhere. I would not recommend making your own account, in your name, the main admin account. Instead, I recommend creating a second account, with administrator privileges, for yourself, but leave the admin account purely for administrative activities.
Configuring Outgoing Email
To allow your NextCloud instance to send outgoing email, so that your site can alert you to security updates that need to be applied, or so that users can request a replacement password if they've forgot theirs, you'll need an authenticating SMTP account somewhere. Most of you already have one. You'll probably want to set up a dedicated email address for this server somewhere, perhaps something like "nextcloud@your.domain" or similar, with a username (often just the email address) and a password. You'll need the following details:
SMTP server : an IP address or a domain name
SMTP username: a username or an email address
SMTP password: a strong password already configured for the username on that server
SMTP login security: whether login is via TLS, SSL, or unsecure (!!), and
SMTP login method: plain, encrypted, "login" or some other value.
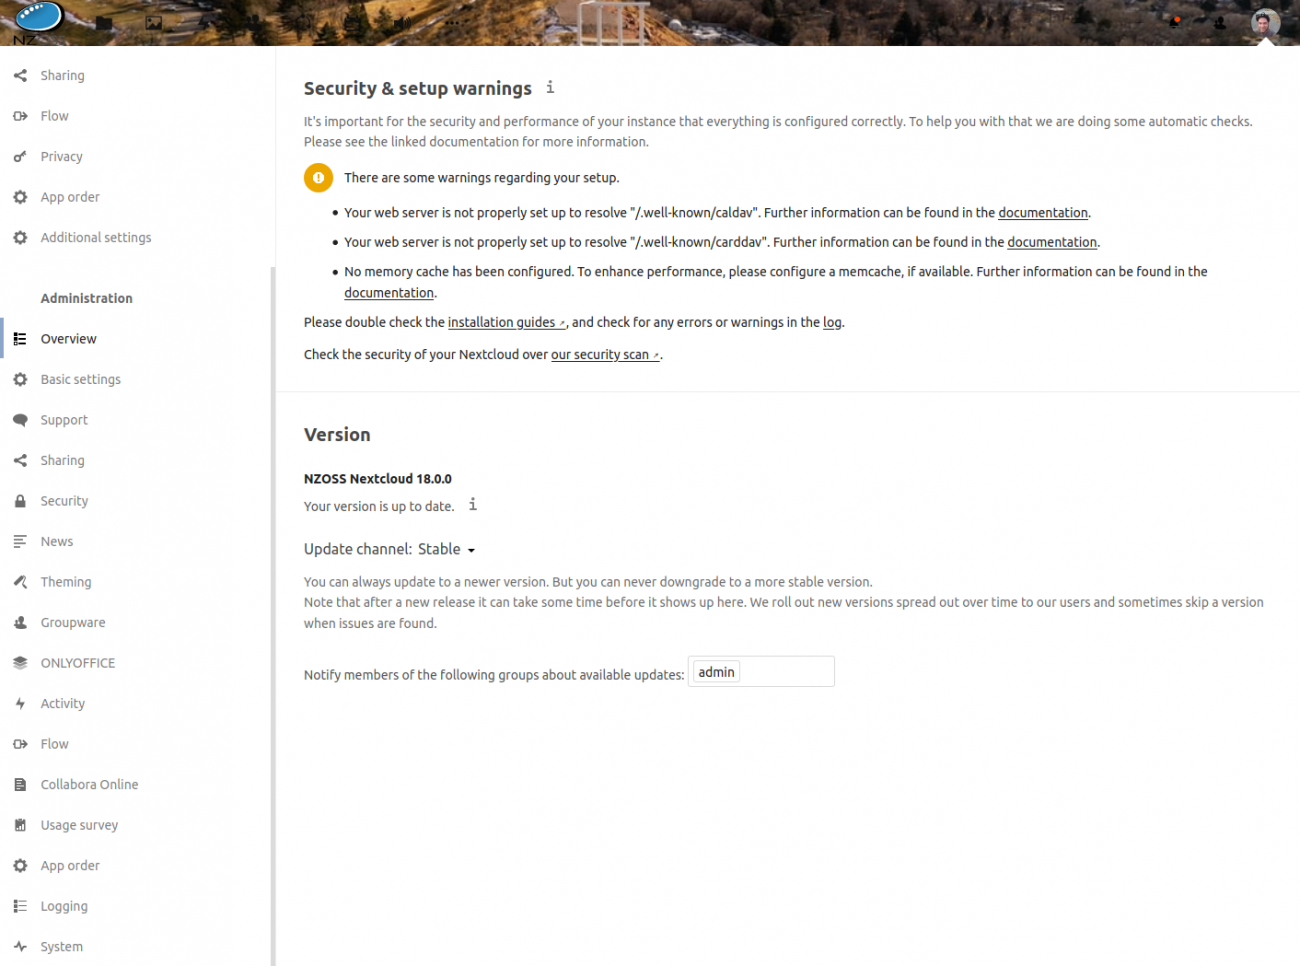
You should be able to test your email settings to make sure the details you've entered are valid. If you need to adjust these settings later, you can go to the admin menu (top right of the web browser interface) and go to Admin->Additional Settings - should have a path of https://nextcloud.domain/settings/admin/additional
Setting up OnlyOffice
The OnlyOffice server should already be running - if you point your browser at https://nextcloud.domain/ds-vpath/ you should see something like the "Document Server is running" (with a big green "tick") page included in the images accompanying this article.
Configuring OnlyOffice Integration with NextCloud
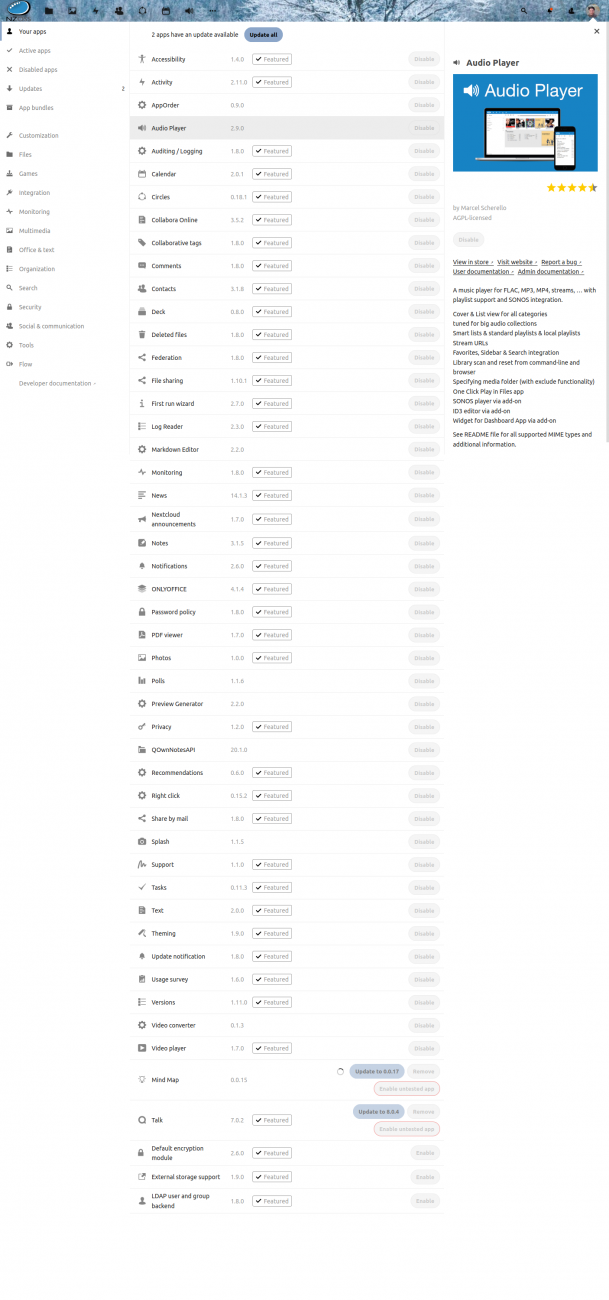
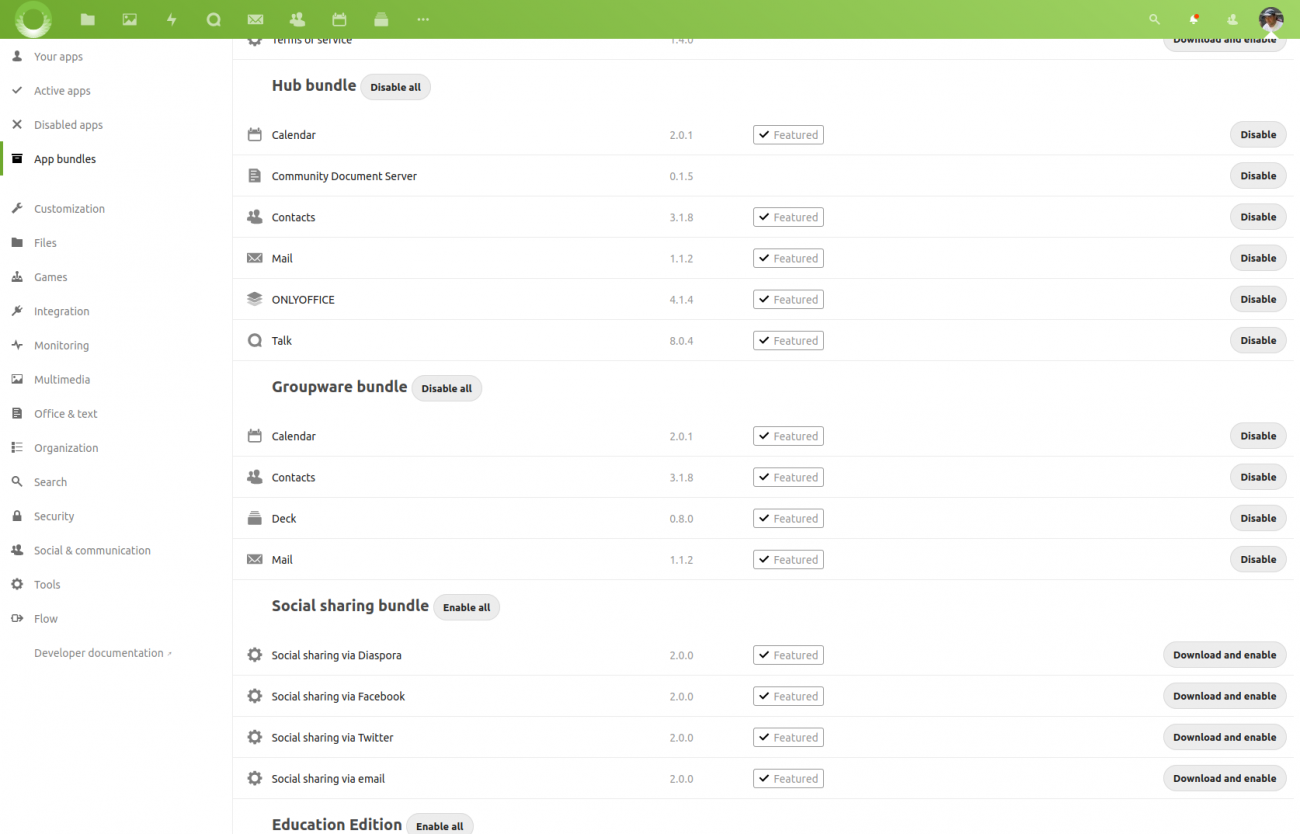
Once you're logged in to NextCloud as your own user, looking at your own default folders, you can start having a look around. You should have an "admin" menu (assuming you've created your user with Administrator privileges) at the top right of the web interface. If you go to Apps, you can install the new "Hub bundle" available under the "App bundles" option (see attached image). If you don't want the whole bundle you can just use the search box to search for "OnlyOffice" or go to the "Office & text" App category and enable the OnlyOffice "official" app, at which point it will automatically download the latest version of the connector app and install it (it should appear in your /home/data/nextcloud/apps directory)
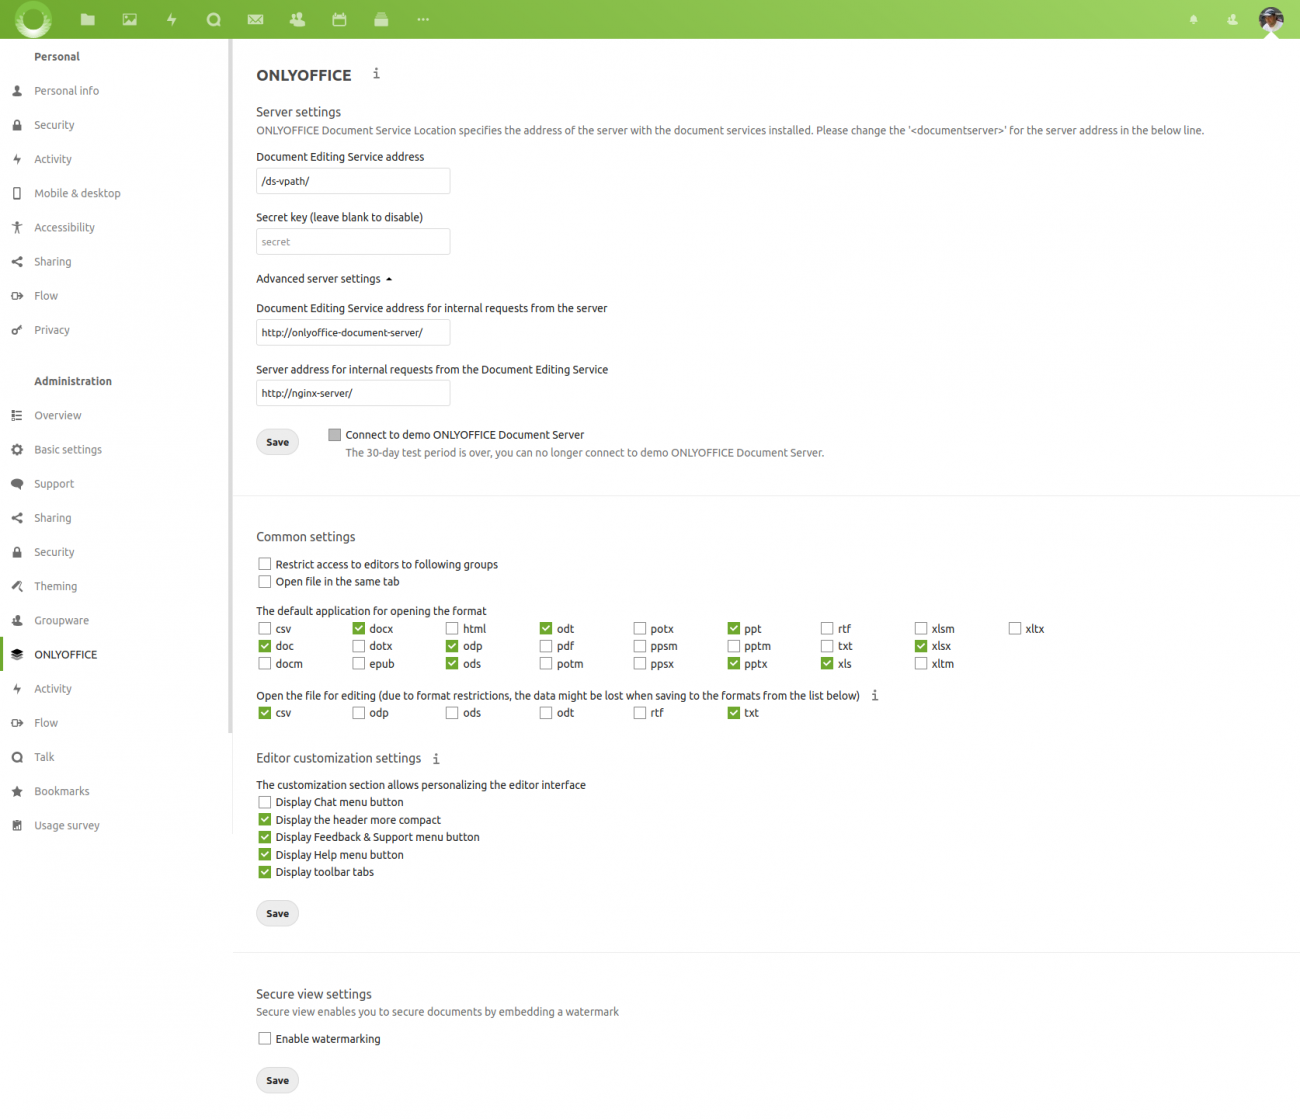
Once you've done that, go to your top right menu again, selecting Admin, and you should see "OnlyOffice" as an option in the left column (which starts with "Basic settings"). Selecting that, you'll need to enter the following:
- "Document Editing Service address":
/ds-vpath/ "Secret key": (leave blank)- Under "Advanced server settings"
-
"Document Editing Service address for internal requests from the server":
http://onlyoffice-document-server/ -
"Server address for internal requests from the Document Editing Service":
http://nginx-server/
-
When you're done, click "Save".
You can also select formats you'd like OnlyOffice to open and edit files of those types are clicked or created. I've selected the following: doc, docx, odp, ods, odt, ppt, pptx, xls, xlsx, and in the second section: csv and txt.
You can also make other editor customisations as you desire. The only Editor customisation setting I haven't selected is "Display Chat menu button" because NextCloud Hub provides an integrated Chat service, making this one within OnlyOffice an unnecessary distraction.
Once finished configuring, you should have the ability to go back to the home of your NextCloud install, which should show you your top-level folders. If you click the "+" next to the home icon (top left of the folder pane) you should now have the option to create (in addition to "Upload file", "New folder", "New text file") a "New Document", "New Spreadsheet", and "New Presentation". Clicking those should give you the OnlyOffice interface for the designated content type.
Similarly, you can use the "Upload file" to upload a document in a format that is supported by OnlyOffice. Once uploaded, clicking on the filename should open it for editing in the appropriate OnlyOffice interface.
It is saved as it is changed, so you shouldn't need to save it explicitly.
Keeping the whole thing up-to-date
So, as you're no doubt aware, both NextCloud and OnlyOffice are always being improved and updated. I certainly encourage you to keep your installations up-to-date.
While you'll periodically be alerted that NextCloud apps have available updates (these can be upgraded through the browser interface) updates to the NextCloud and OnlyOffice systems themselves need to be undertaken by upgrading their containers. Luckily it's easy to do (although I strongly urge you to ensure you have a very recent backup of both database and uploaded files - they're the files in /home/data/nextcloud/data and /home/data/onlyoffice/ (note, backups of OnlyOffice are complicated somewhat by the fact that you can't reliably back up running PostgreSQL instance simply by backing up its files - see a solution below):
Updating the container should be as easy as either doing another
docker-compose pull
and then shutting down Docker container via a
docker-compose up -d
which will remove any old containers (this won't remove any data you want to save if you followed the directions above! But remember to do it in the right directory!) and start up the new versions you've just pulled.
Use docker-compose logs -f to watch the logs - you'll likely see useful debugging information in the unlikely event that something goes wrong in the upgrade process.
Backing up NextCloud
To back up your instance on your server, you need two things: a file system backup of your /home/data/nextcloud directory, and database dumps of your database.
There're lots of ways to back up your files (I've recently updated to using a system called Restic to make off-server incremental encrypted backups - I plan to document this in a future howto! - although there're other documented approaches - leave a comment below if you'd like to learn more about my approach!).
Backing up your MariaDB databases is as easy installing automysqlbackups:
sudo apt install automysqlbackups
You'll find daily versioned dumps of your MariaDB database(s) in /var/lib/automysqlbackups on your VM host's filesystem. To run an ad hoc backup (which will replace the previous backup from that day, if there is one) just run
sudo automysqlbackups
Backup OnlyOffice
Along with backing up the files in your /home/data/onlyoffice directory, you'll also want a proper "dump" of your PostgreSQL backup (you can write simple bash scripts to do this regularly, automatically), particularly prior to doing an upgrade (to allow for recovery if something goes badly wrong, which is always possible). You can achieve this by going to
cd /home/docker/onlyoffice
and running this
DATE=`date +%Y%m%d` && FILE=/home/data/onlyoffice/backup/fullbackup-${DATE}.sql && docker-compose exec onlyoffice sudo -u postgres pg_dumpall > ${FILE} && gzip ${FILE}
which will assign the current date to DATE, the relevant filename to FILE, and then put the backup SQL into a dated file called $FILE and compress the result with gzip :)
At some point, I'll modify my normal versioned dated database backup scripts to cater for this solution and make the result available on https://git.oeru.org - in the meantime, you can use the above before you do a backup and manually delete older backups if they start taking up too much space (or, better still, write your own clever script that does it automatically and let me know about it!).
Add new comment