Install NextCloud Hub and OnlyOffice on Ubuntu 22.04 with Docker Compose
'''Update 2025-02-03:''' Here's a new tutorial for Ubuntu 24.04 and NextCloud 30! Consider this older tutorial obsolete (but possibly helpful for people with older systems).
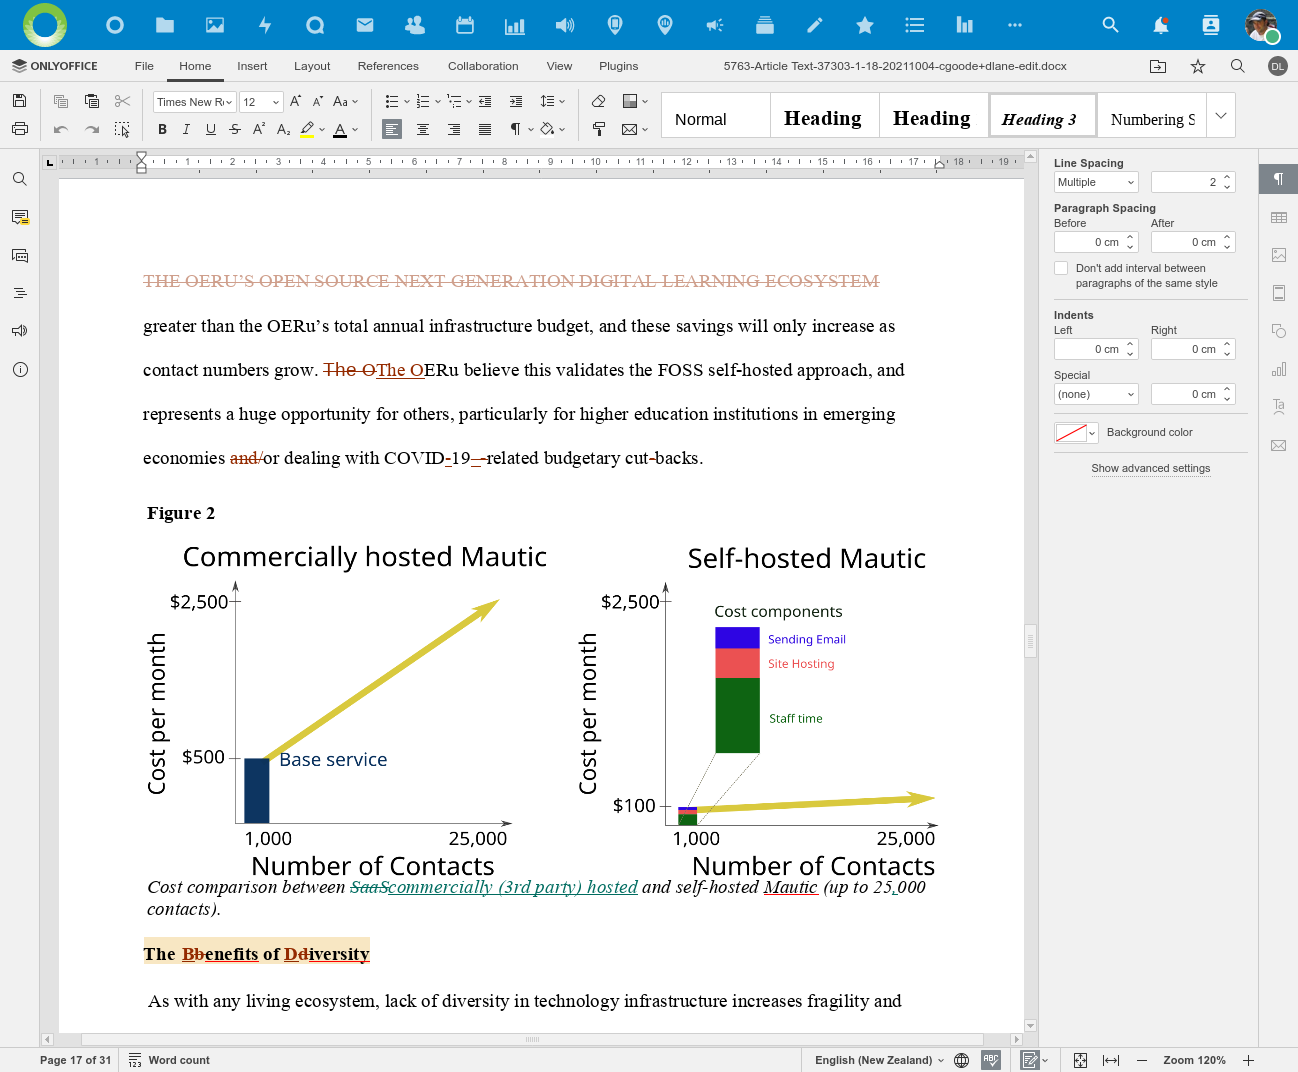
This is another update of my previous posts (installing NextCloud with Collabora Office Online on Ubuntu 16.04 and then NextCloud with OnlyOffice on Ubuntu 18.04). I'm updating it thanks to my colleague in edtech, Stephen Downes' heroic videos showing how he went through this process using my 18.04 instructions on 22.04, running into a few minor issues... this update seeks to remedy the problems he encountered with the older tutorial. Remember, all these Free and Open Source Software projects are progressing and improving relentlessly, which means the they way they behaved a few years ago is not likely to be exactly the way they behave now. In particular, NextCloud is leaping from strength to strength, benefiting from the well-founded concern held by many in the EU about data sovereignty and the market domination (and exploitation) of US-based multinationals like Amazon, Google, Microsoft, Dropbox, and others.
There're a few productivity packages that can be used in conjunction with NextCloud to provide comparable functionality to, for example, GoogleDocs + GoogleDrive or Microsoft Office 365 + Microsoft OneDrive, including Collabora Office (which we've used in the past). But the best companion productivity suite for NextCloud, in my opinion, is OnlyOffice. The application itself (for the tech focused reader, they've built an entirely new application ecosystem primarily using modern Javascript frameworks) is impressive in both capabilities and polish. The only real caveat I've come across is that it uses, by default, the 'fauxpen' standard formats developed by Microsoft rather than the true open standard formats of OpenDocumentFormat. But in a world where, sadly, most people don't even know what a file format is, any software that doesn't read and write the incumbent monopolist's format with great fidelity is dead in the water. On that count, OnlyOffice is impressive. NextCloud + OnlyOffice - even better together (without a single US multinational tech giant involved. NextCloud development is led from Germany, OnlyOffice's development is led by a team in Latvia)!
The beauty of the open source software model is that we can connect complementary applications, like NextCloud and OnlyOffice - developed by completely separate communities - to create a tightly integrated, highly functional, diverse computing platform. This combination, along with a bunch of other NextCloud "apps", is the equal of something like Google Apps (which includes Google Docs and Google Drive), but is under your control, not Google's. To me, that's a crucial difference.
With the release of NextCloud 26.0 (current as of this writing), NextCloud has the option of installing NextCloud Office (which is just a bundled OnlyOffice installation) alongside it, creating something called "NextCloud Hub". It's pretty impressive, but I've found that managing the OnlyOffice install is problematic and somewhat inflexible, so I've opted to stay with having an independent (rather than bundled) OnlyOffice instance, but it's on the same server but managed as a different service. That's what we'll be setting up here!
Tips for this tutorial
This tutorial is aimed at adventuresome would-be system administrators. I endeavour not to assume any specialised knowledge on your part, and try to provide useful tips and exposition along the way to help you build a valid mental model of what you're doing. At the same, this is not a trivial process. Luckily, if you try it out, and decide not to follow through, so long as you delete your VPS, you should not be out-of-pocket by more than a few cents.
If this is your first attempt at 'self-hosting', and you do follow through, this could be the start of a new era in your technical status - you could realised that self-hosting 'agency' you always wanted. People with that skill set are in hot demand among most organisations, especially in the NGO/charitable spaces. Plus, I'll be very impressed by your moxie!
With this tutorial, I'm assuming you've got a computer with an Internet connection, that can run SSH (all modern systems should do that) and you can copy-and-paste stuff from this tutorial (in your browser) into either a terminal window (in which you're SSH'd into your VPS) or into a text editor. Note, if you find it difficult to paste into a terminal window, try using CTRL+SHIFT+V (CTRL+V is already used as a short-cut for something else in UNIX terminals since long before the Windows world started using CTRL+C and CTRL+V).
When I provide files you need to copy, look for the placeholders with values you need to substitute (search-and-replace) in square brackets - [] - with your own values. I assume you'll be able to do that in a text editor on your desktop.
Create a Virtual Private Server
The first step is to create a place to host the NextCloud and OnlyOffice instances. You can run them on a local piece of hardware of sufficient capacity, but make sure you've got a fast and symmetrical (as fast to upload as to download!) connection. If (as with most residential Internet services) your upload is much slower than your download (often 1:10 ratio) your server is going to be very slow for external people, especially if streaming video. Also, don't undertake this unless you have a flat-rate data connection.
The more cost-effective approach in our experience, is to secure a low cost commodity Linux Virtual Private Server running Ubuntu Linux 22.04 (the latest "Long Term Support" version). That's what we'll assume you're running for this tutorial. We have used quite a few Linux VPSs commodity providers. Known good options are Digital Ocean (who recently raised their prices significantly), Linode, Vultr, Hetzner, and TurnkeyLinux. There are many (hundreds) of other credible options. We recommend you find one hosted in the network epicentre (which isn't necessarily the same as the 'geographic' epicentre) of your audience. For the record, we've just shifted our hosting to Hetzner as they've got the benefit of not being US-owned (They're German, and therefore don't expose us to the egregiously over-reaching US Cloud and Patriot Acts) and their pricing is pretty unbeatable.
If you have trouble getting a VPS, you might find this video I created for provisioning a VPS, using Digital Ocean as an example. In my experience, the process for provisioning VPSs on other platforms is very similar. You'll find this process much easier than using either Microsoft Azure or Amazon AWS, which we do not recommend. Their systems are unnecessarily complex, proprietary (they will lock you in), and 10-20 times more expensive than commodity hosting options already listed.
VPS Properties:
We recommend that, for a NextCloud instance of modest size (say up to 50 users) you provision a VPS with the following spec. You should be able to upgrade those specs in realtime if required, except for your disk space. You can, however, provision a secondary storage space (you can start small and increase it as you need to). I will cover setting this up, as it'll make your life far far easier in the medium-long term.
- 4-8 GB RAM
- 2-4 Virtual CPUs
- 80-160 GB Disk space (NVME disk is faster than SSD which is faster than spinning disk space)
- running Ubuntu Linux 22.04 (the current Long Term Support version)
- extra storage - 20-40GB extra space (can be expanded on fairly short notice)
You'll need to create an account for yourself on your chosen hosting provider (it's a good idea to use Two Factor Authentication, aka 2FA, on your hosting account so that no one can log in as you and, say, delete your server unexpectedly - you'll find instructions on how to set up 2FA on your hosting provider's site) and create an Ubuntu @2.04 (or the most recent 'Long Term Support' (LTS) version) - 24.04 is likely to come out in April 2024) in the 'zone' nearest to you (or your primary audience, if that's different).
If you don't already have an SSH key on your computer, I encourage you to create one and specify the public key in the process of creating your server - specifying the 'public key' of your SSH identity during the server creation process that should allow you to log in without needing a password!
You'll need to note the server's IPv4 address (it'll be a series of 4 numbers, 0-254, separated by full stops, e.g. 103.99.72.244), and you should also be aware that your server will have a newer IPv6 address, which will be a set of 8 four hex character values (each hex character can have one of 16 values: 0-9,A-F) separated by colons, e.g. 2604:A880:0002:00D0:0000:0000:20DE:9001. With one or the other of those IPs, you should be able to log into your new server via SSH. If you're on a UNIX command line (e.g. a Linux or MacOS desktop), do this in a terminal. On Windows, I understand people use a tool called Putty for SSH, in which case follow the app's instructions.
ssh [your server IPv4 or IPv6]
followed by the ENTER key (that'll be true for any line of commands I provide).
In some cases, depending on your hosting provider, you'll have a password to enter, or if you've specified your pre-existing public SSH key, you shouldn't need to enter a password at all, you should be logged in. To check what user you care, you can type
whoami
If it returns root (there's also a convention of using a '#' as the command prompt), you're the root or super-admin of the server. If not, you're a normal user (some hosting providers have a convention of giving you a default user called "ubuntu" or perhaps "debian") with a prompt that is, by convention, a '$'.
Now that you're logged in, it's worth doing an upgrade of your server's Ubuntu system! Do that as follows (this works regardless of whether your a root user or an unprivileged user with 'sudo' ability):
sudo apt update && sudo apt dist-upgrade
Usually the user, even if it's not the root user, will have the ability to use the sudo command modifier - that means "do this action as the root (aka the 'Super User', thus 'su' in 'sudo' for short) user" - if you're a non-root user, you'll likely be asked to enter your password as a security precaution the first time you run a command prefaced by sudo. Enter it, and it should run the command. Plus, the system shouldn't bother you for it again unless you leave your terminal unused for a while (usually 5 minutes) and come back to it.
At this point, I also like to install a cool software package called 'etckeeper' which records configuration changes on your VPS for future reference (it can be life-saving if trying to recover from an administrative mess-up!):
sudo apt install etckeeper
which will also install some dependencies, including the very important (and relevant later on) 'git' version control system.
Key variables for you NextCloud and OnlyOffice instances
To set up your services, you'll need a few crucial bits of information related to your system's identity and external systems you'll need it to interact with. For example, as mentioned before, you'll need a domain name. For the rest of this tutorial, we'll use the convention of representing those variables as a name inside [], or, for the domain name you've picked, [domain name].
Here's a list of variables you'll need to know to complete the rest of this tutorial:
- [ipv4] and [ipv6] - your VPS' IPv4 and IPv6 addresses (the latter can be ignored if your cloud provider doesn't support IPv6 addresses) as described above.
-
[nextcloud domain] and [onlyoffice domain] - the fully qualified domain names or subdomains of a base [domain name] by which you want your services to be accessed. You must have full domain management ability on this domain. Example: nextcloud.oeru.org - that's the nextcloud subdomain of the oeru.org domain.
*Authenticating SMTP details - this is required so your services can send emails to users - crucial things like email address validation and password recovery emails...
- [smtp server] - the domain name or IPv4 or IPv6 address of an SMTP server
- [smtp port] - the port number on the server that is listening for your connection. By convention it's likely to be 465 or 587, or possibly 25.
- [smtp reply-to-email] - a monitored email to which people can send email related to this WordPress site, e.g. notifications@[domain name]
- [smtp user] - the username (often an email address) used to authenticate against your SMTP server, provided by your email provider.
- [smtp password] - the accompanying password, provided by your email provider.
- [your email] - an email address to which system-related emails can be sent to you, perhaps something like webmaster@[domain name].
- [vps username] - the username you use on your server (by convention, these are one word, and all lower case).
- [redis password] - this is a random secret that secure access to your webserver's cached data - I use a randomly generated alphanumeric password.
- [onlyoffice secret] - this comes from your actual install, and you can get it when the time comes.
- The MariaDB credentials for your NextCloud system (which stores a lot of stuff in MariaDB or MySQL by default)
- [db name] - the name of your MariaDB database for NextCloud - usually 'nextcloud'.
- [db user] - the user who can manage your database.
- [db password] - the user's password.
Get your Domain lined up
You will want to have a domain to point at your server, so you don't have to remember the IP number. There're are thousands of domain "registrars" in the world who'll help you do that... You just need to "register" a name, and you pay yearly fee (usually between USD10-30 depending on the country and the "TLD" (Top Level Domain. There're national ones like .nz, .au, .uk, .tv, .sa, .za, etc., or international domains (mostly associated with the US) like .com, .org, .net, and a myriad of others. Countries decide on how much their domains wholesale for and registrars add a margin for the registration service).
Here in NZ, I use the services of Metaname (they're local to me in Christchurch, and I know them personally and trust their technical capabilities). If you're not sure who to use, ask your friends. Someone's bound to have recommendations (either positive or negative, in which case you'll know who to avoid).
Once you have selected and registered your domain, you can 'manage your Zone' to set up (usually through a web interface provided by the registrar) an A Record which associates your website's name to the IPv4 address of your server. So you should just be able to enter your server's IPv4 address, the domain name (or sub-domain) you want to use for the web service you want to set up.
Nowadays, if your Domain Name host offers it (some don't, meaning you might be better off with a different one), it's also important to define an IPv6 record, which is called an AAAA Record... you put in your IPv6 address instead of your IPv4 one.
You might be asked to set a "Time-to-live" (which has to do with the length of time Domain Name Servers are asked to "cache" the association that the A Record specifies) in which case you can put in 3600 seconds or an hour depending on the time units your registrar's interface requests... but in most cases that'll be set to a default of an hour automatically.
Editing files
In the rest of this tutorial, we're going to be editing quite a few files via the command line. If you're new to this, I recommend using the 'nano' text editor which is installed by default on Ubuntu Linux systems. It's fairly simple, and all of its options are visible in the text-based interface. I tend to use a far more powerful but far less beginner-friendly editor called 'vim'. There're other editors people might choose, too. To use your preferred editor for the rest of the tutorial, enter the following to set an environment variable EDIT, specifying your preferred editor, e.g.:
or, if you're like me
so that subsequent references to $EDIT will invoke your preferred editor. Note the command $(which nano) is a script which finds the full path to the named command, in this case 'nano'. Putting a command inside the $() means 'replace with the value the script returns', so it sets the value of EDIT to the path of the nano command in this case.
To test (at any time) whether you session still knows your $EDIT command, run
echo $EDIT
if it returns the path to your preferred editor, you're good to go. If not, just reassert the EDIT= line from above!
Note: if you log out and back in again, change users, or create a new terminal tab/session, you'll need to reassert the EDIT value.
Set up an unprivileged user for yourself
You should be able to test that your A and AAAA Records have been set correctly by logging into your server via SSH using your domain name rather than the IPv4 or IPv6 address you used previously. It should (after you accept the SSH warning that the server's name has a new name) work the same way your original SSH login did.
This will log you into your server as it did the first time, either as 'root' or the default unprivileged user. It's not considered good practice to access your server as root (it's too easy to completely screw it up by accident). It's a good idea to create your own separate 'non-root' user who has 'sudo' privileges and the ability to log in via SSH. If you are currently logged in as 'root', you can create a normal user for yourself via (replace [vps username] with your chosen username - in my case, I'd use U=dave):
U=[vps username]
adduser $U
adduser $U ssh
adduser $U admin
adduser $U sudo
You'll also want to a set a password for user [vps username] (we have a tutorial on creating good passwords):
passwd $U
then become that user temporarily (note, the root user can 'become' another user without needing to enter a password) and create an SSH key and, in the process, the .ssh directory (directories starting with a '.' are normally 'hidden' - you can show them in a directory listing via ls -a) for the file into which to put your public SSH key:
su $U
after which you need to re-run your EDIT command:
EDIT=$(which nano)
and then run
ssh-keygen -t rsa -b 2048
$EDIT ~/.ssh/authorized_keys
and in that file, copy and paste (without spaces on either end) your current computer's public ssh key (never publish your private key anywhere!), save and close the file.
and then leave the 'su' state, back to the superuser:
CTRL+D or type exit
From that point, you should be able to SSH to your server via ssh [vps username]@[domain name] without needing to enter a password.
These instructions use 'sudo' in front of commands because I assume you're using a non-root user. The instructions will still work fine even if you're logged in as 'root' (the 'sudo' will be ignored as it's unnecessary).
Configure the VPS
First things first. Let's make sure you've got the time zone set appropriately for your instance. It'll probably default to 'UTC' (Greenwich Mean Time). For our servers, I tend to pick 'Pacific/Auckland' which is our time zone. Run this
sudo dpkg-reconfigure tzdata
and pick the appropriate timezone. You can just leave it running UTC, but you might find it tricky down the track if, for example, you're looking at logs and having to constantly convert the times into your timezone.
Configuring your firewall
In the name of safety from the get-go, let's configure our firewall. We work on the basis of explicitly allowing in only what we want to let in (i.e. a 'default deny' policy).
First we'll enable the use of SSH through the firewall (not doing this could lock us out of your machine!)
sudo ufw allow ssh
while we're here, we'll also enable data transfer from the internal (to the VPS) Docker virtual network and the IP range it uses for Docker containers:
sudo ufw allow in on docker0
sudo ufw allow from 172.0.0.0/8 to any
Then we'll enable forwarding from internal network interfaces as required for Docker containers to be able to talk to the outside world:
sudo $EDIT /etc/default/ufw
and copy the line DEFAULT_FORWARD_POLICY="DROP" tweak it to look like this (commenting out the default, but leaving it there for future reference!):
and then save and exit the file (CTRL-X and then 'Y' if your editor is nano).
You also have to edit /etc/ufw/sysctl.conf and remove the "#" at the start of the following lines, so they look like this:
sudo $EDIT /etc/ufw/sysctl.conf
Then we need to restart the network stack to apply that configuration change
sudo systemctl restart systemd-networkd
(on older Ubuntu systems this would have been done via sudo service networking restart...)
Next we have to enable the UFW firewall to start at boot time.
sudo $EDIT /etc/ufw/ufw.conf
And set the ENABLED variable near the top:
ENABLED=yes
Now you can formally start UFW now:
sudo ufw enable
Install the Nginx
Next we need to install the Nginx web server and reverse-proxy, as well as the Let's Encrypt SSL certificate generator, both of which are crucial for any secure web services you might want to host. Nginx is a more efficient and flexible alternative to the older Apache web server you might've seen elsewhere (Nginx recently surpassed Apache as the most widely used web server on the Internet).
sudo apt install nginx-full letsencrypt ssl-cert
You'll get a couple pop-up windows in your terminal, just hit ENTER to accept the defaults. Having installed it, we need to create firewall rules to allow external services to see it:
sudo ufw allow 'Nginx Full'
You can check if the firewall rules you requested have been enabled:
sudo ufw status
Outgoing VPS Email (optional)
Although it's not absolutely necessary (you can do this section later if you're in a big hurry), it's very useful for your server to be able to send out emails, like status emails to administrators (perhaps you) about things requiring their attention, e.g. the status of backups, pending security updates, expiring SSL certificates, etc. To do this, we'll set up the industrial strength Postfix SMTP server, which is pretty quick and easy. First we install Postfix.
sudo apt install postfix bsd-mailx
During the install, you'll be asked to select a bunch of configuration parameters. Select the defaults except:
- Select "Internet Site with Smarthost",
- fill in the domain name for your server [domain name],
- the [smtp server] name and [smtp port] (in the form [smtp server]:[smtp port], e.g. smtp.oeru.org:587 ) of your "smarthost" who'll be doing the authenticating SMTP for you, and
- the email address to which you want to receive system-related messages, [your email].
After that's done, we set a default address for the server to mail to, to [your email] selected above. First
sudo $EDIT /etc/aliases
We need to make sure the "root" user points to a real email address. Add a line at the bottom which says (replacing [your email] with your email :) )
root: [your email]
After which you'll need to convert the aliases file into a form that postfix can process, simply by running this:
sudo newaliases
Then we have to define the authentication credentials required to convince your mail server that you're you!
sudo $EDIT /etc/postfix/relay_password
and enter a single line in this format:
[smtp server] [smtp user]:[smtp password]
as an example, this is more or less what I've got for my system. Note that the [smtp user] in my case is an email address (this is common with many smtp system - the user is the same as the email address):
smtp.oerfoundation.org smtp-work@fossdle.org:SomeObscurePassw0rd
then save the file and, like the aliases file, run the conversion process (which uses a slightly different mechanism):
sudo postmap /etc/postfix/relay_password
Finally, we'll edit the main configuration file for Postfix to tell it about all this stuff:
sudo $EDIT /etc/postfix/main.cf
If your SMTP server uses port 25 (the default for unencrypted SMTP) you don't have to change anything, although most people nowadays prefer to use StartTLS or otherwise encrypted transport to at least ensure that your SMTP authentication details (at least) are transferred encrypted. That means using port 587 or 465. If you're using either of those ports, find the "relayhost = [your server name]" line... and add your port number after a colon, like this
relayhost = [smtp server]:[smtp port]
or, for example:
relayhost = smtp.oerfoundation.org:465
Then we have to update the configuration for Postfix to ensure that it knows about the details we've just defined (this command will automatically back up the original default configuration so you can start from scratch with the template below):
sudo mv /etc/postfix/main.cf /etc/postfix/main.cf.orig && sudo $EDIT /etc/postfix/main.cf
You can just copy-and-paste the following into it, substituting your specific values for the [tokens].
Once you've created that main.cf file, you can double check that your config is valid:
sudo postfix check
and if it's all ok, you can get Postfix to re-read its configuration:
sudo postfix reload
You can then try sending an email so see if it works!
By default, a command line application called "mail" is installed as part of the bsd-mailx package we installed alongside postfix. You can use it to send test email from the command line on your host to verify you've got things working correctly! The stuff in <> are the keys to hit at the end of the line...
mail you@email.domain<ENTER>
Typing (hold down the Control or Ctrl key on your keyboard and press the "d" key) will finish your message, showing you a "CC:" field, in which you can type in other email addresses if you want to test sending to multiple addresses. When you then hit , it will attempt to send this email. It might take a few minutes to work its way through to the receiving email system (having to run the gauntlet of spam and virus filters on the way).
You can also always check the postfix system logs to see what postfix thinks about it using the command:
sudo less +G /var/log/mail.log
if your system doesn't have a /var/log/mail.log, never fear! Try this instead:
sudo less +G /var/log/syslog
In either case, hit to have the log update in real time.
Installing Docker Compose and Let's Encrypt
The next step is to set up the file structure for holding your Docker configurations and the data your Docker containers will access. This is my convention, so you're welcome to do things different, but this is a 'known good' approach.
First let's install Docker Compose (and its dependencies, like the whole Docker subsystem) and the Let's Encrypt scripts that let you procure no-cost Secure Sockets Layer certificates to secure access to your server.
sudo apt install docker-compose letsencrypt
Now we create the set of directories I use for holding Docker Compose configurations (/home/docker) and the persistent data the Docker containers create (/home/data)
followed by
It's helpful to make sure that your non-root user can also read and write files in these directories:
Installing MariaDB
MariaDB is effectively a drop-in alternative to MySQL and we prefer it because it's not controlled by Oracle and has a more active developer community. On Ubuntu, MariaDB pretends to be MySQL for compatibility purposes, so don't be weirded out by the interchangeable names below. Install the server and the client like this.
sudo apt install mariadb-server mariadb-client
You should now be able to type sudo mysql at the command prompt, and it'll log you into the MariaDB console (to get out type \q or exit)
Tweak the configuration so that it's listening on
sudo vim /etc/mysql/mariadb.conf.d/50-server.cnf
and copy the bind-address line and adjust so it looks like this - we want MariaDB to be listening on all interfaces, not just localhost (127.0.0.1)...
Then restart MariaDB:
sudo service mysql restart
It should now be listening on port 3306 on all interfaces, i.e. 0.0.0.0. Your instance will be protected from anyone outside of your VPS connecting to it by the fact that external access to port 3306 isn't allowed by your ufw firewall.
To check it's running, you can run
sudo netstat -punta | grep 3306
and you should see something like
tcp 0 0 0.0.0.0:3306 0.0.0.0:* LISTEN 8459/mysqld
which is the 'mysqld' (the MySQL-compatible database daemon provided by MariaDB).
Now set up the database which will hold NextCloud's data. Log into the MySQL client on the host:
sudo mysql
You'll need to gin up a password for your "nextcloud" database user. I usually use pwgen (sudo apt install pwgen) - for example running this command will give you a single 19 character password without special characters (just numbers and letters):
pwgen -s 19 1
Giving you something like this (but if it's truly random, almost certainly not exactly this):
bYIOSrvR9aGwL5FRGFU
At the prompt (which will look something like MariaDB [(none)]>) enter the following lines (putting your password in place of [passwd]):
Then enter \q to exit.
Configuring Nginx reverse proxy for NextCloud and OnlyOffice
Above, we installed Nginx as well as the Let's Encrypt scripts. Now we'll configure them as it's useful to have them working before you set up your services.
In order for you, outside of your server, to see the NextCloud and OnlyOffice services, you will need to set up a secure external 'reverse proxy' on your host VPS which will accept requests for those two services from the Internet and pass those requests securely to the two sets of Docker containers providing the services. These will answer to https://[nextcloud domain] (for NextCloud) and https://[onlyoffice domain] for OnlyOffice.
Let's Encrypt will provide the SSL certificates (each is a file with a specially generated, very long string) which we use to limit access to our services to encrypted (secure) connections (protecting both our users and ourselves from external enemies).
Nginx will not run unless the SSL certificates you reference in your configurations are valid. Given that we need to request them with a working Nginx prior to them being created puts us in an awkward position. We use a trick to get around it: we temporarily reference the default 'self-signed' SSL certificates (sometimes called 'Snakeoil certs' because that's the placeholder name they're given) that every new Linux system generates when it's installed, that are valid certificates (and thus acceptable to Nginx) but *they won't work with our domains, as they're generic and not 'signed' by an external party, like Let's Encrypt, meaning that your browser won't like them. But that's ok, as you browser will never need to see them, and Let's Encrypt's systems won't look at them either. We'll swap the Snakeoil certs out as soon as we've successfully created the Let's Encrypt ones, and your browser will be happy, and all will be well with the world.
Note: many thanks to Stephen Harlow (who crash-tested this tutorial!) for pointing out that you might need to run the following if you're not finding the 'Snakeoil certs' on your system (running them just to be safe shouldn't cause any issues):
sudo make-ssl-cert generate-default-snakeoil
Let's Encrypt setup
Let's Encrypt and Nginx need to work together. Nginx stores all of its configuration in the directory /etc/nginx. The first thing we'll do is create a place for Let's Encrypt Nginx-specific configuration details:
sudo mkdir /etc/nginx/includes
Then we create that configuration file itself:
sudo $EDIT /etc/nginx/includes/letsencrypt.conf
into which we copy-and-paste the following (no [tokens] to replace in this one!)
As described in the file we've just created, Let's Encrypt will look for a secret code we create to verify that we own the domain we're requesting an SSL certificate for, so we have to make sure it exists:
sudo mkdir /var/www/letsencrypt
NextCloud Proxy Configuration
To configure the NextCloud proxy, you need to create this configuration file in your /etc/nginx/sites-available/ directory.
Create a file with a meaningful name for your NextCloud Proxy, something like "nextcloud" (I use the domain name I've chosen, e.g. for docs.oeru.org I call the proxy file "docs.oeru.org" - keeps everything clear, and I can have multiple instances on the same server if I want...). Let's go with in this instance (change it if you prefer)
sudo $EDIT /etc/nginx/sites-available/nextcloud
with the following contents, replacing [nextcloud domain] with your selected domain name, but leave off the [ ] (those are just there to make sure nginx errors if you've missed replacing any) - and the port number 8080 if you've opted to change to a different one!:
Note: you'll need to create the file cited in the proxy configuration: /etc/ssl/certs/dhparam.pem
You can do this as follows (install the necessary software, backup any possible existing version as a matter of prudence, and create a new one):
Once those are created, you have to make sure that they're "enabled" (replacing with your file names, of course):
cd /etc/nginx/sites-enabled
sudo ln -sf ../sites-available/nextcloud .
To confirm that there aren't any typos or issues that might make nginx unhappy, run
sudo nginx -t
If all's well, get nginx to reread its configuration with the new files (if not, it might be because you missed replacing one of the [tokens]):
sudo service nginx reload
OnlyOffice Proxy Configuration
The OnlyOffice proxy configuration uses a very similar process to the one above. You just need to create another configuration file:
After that's done, we'll repeat what we did for the NextCloud config:
sudo cd /etc/nginx/sites-enabled
sudo ln -sf ../sites-available/onlyoffice .
sudo nginx -t
and, if there're no errors, run
sudo service nginx reload
Now we're ready to request Let's Encrypt certificates.
Requesting Let's Encrypt certificates
To request Let's Encrypt SSL certificates for your NextCloud and OnlyOffice services, run the following, replacing the [token], of course (note that 'certbot' is the script provided by the Let's Encrypt package - historically, it could also be called via 'letsencrypt', although apparently the latter is now deprecated):
sudo certbot --webroot -w /var/www/letsencrypt -d [nextcloud domain]
Note - if you want to address your instance from multiple domains, use one (or more) -d [another domain] - just make sure that
- all those domains already point to your VPS, and
- those domains are included in the Nginx proxy configuration above.
otherwise the Let's Encrypt certbot request will fail!
Here's what you're likely to see as output from the first run of the letsencrypt script - note that it will ask you for an email address (so it can send you warnings if your certificate is going to expire, e.g. due to a problem with renewal (like if you make a configuration change that breaks the renewal process)).
Ideally, you'll see a message like the above. If not, and there's an error, the error messages they provide are usually very useful and accurate. Fix the problem and try again. Note, your SSL certificate will have the name of your [nextcloud domain], even if it also provide support for [second domain name] (or third, fourth, etc.).
Once you have a Let's Encrypt certificate, you can update our NGINX configuration:
sudo $EDIT /etc/nginx/sites-available/[nextcloud domain]
and swap all occurrences of
to
which enables your new domain-specific SSL certificate. Check that NGINX is happy with your change:
sudo nginx -t
and if so,
sudo service nginx reload
You domain should now be enabled for https:// access. Note that going to http://[nextcloud domain] should automatically redirect you to https://[nextcloud domain] because you care about your user's security! :grin:
Now you'll have to repeat the same process for the [onlyoffice domain]. When that's done... Onward!
Prepare your Docker Compose host
We make use of the NextCloud community's stable Docker container which they keep (more or less) up-to-date. Similarly, the OnlyOffice developers maintain a Docker container, too. We will run them both on this same server as separate services via Docker Compose. The two sets of Docker containers will look like this:
- a suite of NextCloud containers:
- the main PHP-FPM container (which provides most of the functionality for NextCloud using the PHP scripting engine,
- an identical container to the PHP one which runs the cron service (which does periodic administrative tasks relevant to NextCloud)
- a Redis container (which provides performance improving caching for NextCloud), and
- an Nginx webserver container which makes it easier to manage the configuration and paths of the NextCloud instance. It means that on the hosting server, we only need to run a proxying web server, which is easy.
- the single OnlyOffice container which, despite the Docker convention of each container running only a single services, runs the whole OnlyOffice stack, which includes PostgreSQL, Nginx, Rabbit-MQ, Python, and NodeJS.
The way I prefer to implement this set of containers is to use:
sudo apt install docker-compose
to set up the entire Docker and Docker Compose system on your server. If you desire, you can also set up a newer version of Docker Compose, namely the 2.x series. The command line interface and feedback on actions is nicer with this newer version, but otherwise, there's little difference (a few other services I run require 2.x, like Mailcow, so I've had experience with both).
Then set up a place for your Docker containers and the associated persistent data (your Docker containers should hold no important data - you should be able to delete and recreate them entirely without losing any important data or configuration):
My personal convention is to name both docker and data directories after the specific domain name of the service to which they apply - makes it easier when, for example, I have multiple instances of NextCloud on a single server. The above is intended to be straight forward for folks only running one of each - but feel free to modify for your requirements. If you do so, remember to ripple that through the rest of these instructions!
NextCloud Install
Install the NextCloud Docker recipe
Now we have a place to put the really key bit - the code for running NextCloud and OnlyOffice via Docker Compose. First, let's set up NextCloud (this also installs the OnlyOffice server):
cd /home/docker/nextcloud
You'll have to create a file, e.g via
$EDIT docker-compose.yml
and fill it with this (substituting the values in [] to suit your details - and changing the paths in /home/data if you've used something different than the default above!):
The "port" specified above, 8080, for nginx is arbitrary - I picked it to ensure it doesn't don't conflict with ports being used by other containers on my server - you can use this value if you want, or use sudo netstat -punta (you might need to install the package that provides netstat first, sudo apt install net-tools) to see what ports are currently claimed by other services on your server (if there are any) and pick one that doesn't clash! If it scroll past too fast, you can pipe it into less to allow you to scroll and search like this: sudo netstat -punta | less - hit "q" to exit or "/" to initiate a text search. Or, if you want verify that a specific port is not already being used, you can do this (in this case for port 8080) via sudo netstat -punta | grep 8080 - if it returns any results, something is already listening on that port. If not, it's available.
The NextCloud Nginx configuration
You will also need to provide the "nginx.conf" file referenced in the nginx section of the Docker Compose configuration. Do that via
$EDIT /home/data/nextcloud/nginx/nginx.conf
and copy-and-paste the following incantation (you shouldn't need to change anything in this one) - there're notes in it offering some explanations:
That should be all the configuration you need to make the NextCloud Docker containers go.
The OnlyOffice Docker configuration
We also need to something similar (but easier) for OnlyOffice. This is the docker-compose.yml that I use:
cd /home/docker/onlyoffice
$EDIT docker-compose.yml
and copy-and-paste this into it (replacing the []):
Now, we can fire it up provisionally:
docker-compose up -d && docker-compose logs -f
We'll find the value of [onlyoffice secret] a bit later, below.
To get back to a command prompt without killing the running Docker container execute a CTRL-C.
Firing up your NextCloud!
Phew - congratulations on getting here! We've reached the moment of truth where we need to see if this whole thing will work!
We need to make sure we're back in the NextCloud Docker directory we set up:
cd /home/docker/nextcloud
Then you can run:
docker-compose up -d && docker-compose logs -f
This will trigger the initial download of the docker container images you've specified in your docker-compose.yml file. All going well, after a few minutes (longer or shorter depending on the speed of your server's connection) you should have download the Nginx, Redis, and NextCloud Docker images, and then the script will attempt to start them (bringing them "up" in daemon mode with the -d, meaning they'll keep running even if you log out) and then, if successful, the logs -f command will run and show you a stream of log messages from the containers, each preceded by the container name to which it corresponds. This should help you debug any problems that occur during the process (ideally, none).
Once you see log messages streaming past, and no obvious "container exited" or other error messages (which will usually contain the word "error" a lot), you should be able to point your browser at your selected domain name and have your fist visit to your NextCloud in your browser! Just point your web browser at https://[nextcloud domain] (replacing with your domain, of course. You should also try going to http://[nextcloud domain] (note the missing 's' from http) which should automatically redirect you to https://[nextcloud domain] as the reverse proxy file instructs.
Again, to get back to a command prompt without killing the running Docker containers execute a CTRL-C.
The NextCloud source code (if necessary)
Normally the source code for NextCloud's current stable version is transparently downloaded and installed by the NextCloud Docker container the first time it's instantiated. If it is, you'll see a bunch of files and directories in your /home/data/nextcloud/nextcloud folder. If so, you're fine and you can move on to the next step.
If not, you can always find the most recent stable release's source code here. I tend to prefer the .tar.bz2 archive format, so I get it from this link: https://download.nextcloud.com/server/releases/latest.tar.bz2 (which, fingers crossed, should remain valid indefinitely - if not, check the previous link or look for 'Download' on the NextCloud website.).
We need to get that file and extract it in /home/data/nextcloud, so do the following (if wget isn't already installed, get it via sudo apt install wget):
which will create a directory 'nextcloud' with the latest (stable) version of the NextCloud source code in that directory.
Then reassert the file permissions just to be sure
sudo chown -R www-data nextcloud
After that, you should be able to point your browser at your domain (the containers are already running) and see if it starts the install process as it should. [/code]
You can figure out what version that is by running:
cat nextcloud/version.php | grep VersionString
With my latest install, I get the result:
Note, I tend to hold on to install archives for safety's sake, so I generally do the following to tidy up (still in the nextcloud data directory), replacing [version] with the advertised most recent stable version of NextCloud (26.0.2 in my case):
Now you've got the source code for NextCloud where you containers are configured to look for it!
Configuring database access
On doing so, if all is well, you should be directed through the database set up process for your NextCloud instance. You'll be asked for your database details, which should be:
Configuring the Admin user
Once that's set and working, NextCloud will install all the relevant database tables and initial data. You'll be asked to set up an admin user account, which can be "admin" and some strong password you create (you can use the pwgen utility you used earlier) - I'd recommend recording it somewhere. I would not recommend making your own account, in your name, the main admin account. Instead, I recommend creating a second account, with administrator privileges, for yourself, but leave the admin account purely for administrative activities.
Configuring Outgoing Email
To allow your NextCloud instance to send outgoing email, so that your site can alert you to security updates that need to be applied, or so that any of your NextCloud users can request a password reset if they've forgot theirs. For this, you'll need the authenticating SMTP account details from the start of this process. You'll need:
You should be able to test your email settings to make sure the details you've entered are valid. If you need to adjust these settings later, you can go to the admin menu (top right of the web browser interface) and go to Admin->Basic Settings - should have a path of https://[nextcloud domain]/settings/admin.
Setting up OnlyOffice
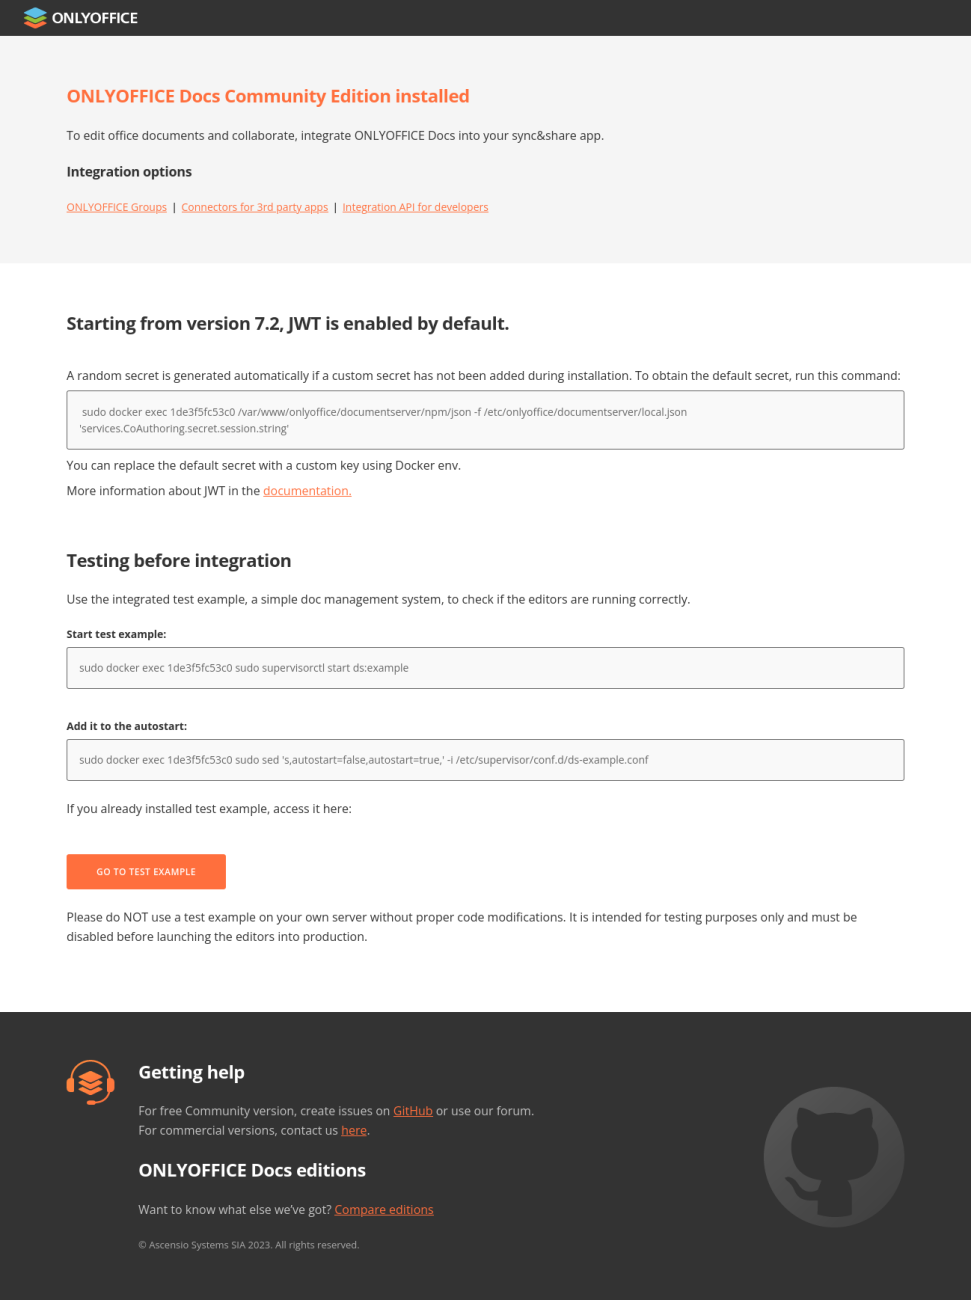
The OnlyOffice server should already be running - if you point your browser at https://[onlyoffice domain] you should see a page like the attached screenshot with the OnlyOffice Logo and a title of "OnlyOffice Docs Community Edition".
Configuring OnlyOffice Integration with NextCloud
To configure your NextCloud to use your OnlyOffice, the OnlyOffice will require that NextCloud knows its "secret". To generate the secret, run this in /home/docker/onlyoffice:
docker-compose exec onlyoffice /var/www/onlyoffice/documentserver/npm/json -f /etc/onlyoffice/documentserver/local.json 'services.CoAuthoring.secret.session.string'
The resulting secret string, which will look something like QC7QmEqUpXmmnwXZcvBQ needs to be added to your OnlyOffice docker-compose.yml file to ensure that the same code is used everytime you start OnlyOffice (if it isn't set, it'll be generated each time you restart OnlyOffice and your NextCloud will need a different 'secret' each time - a major inconvenience).
$EDIT /home/docker/onlyoffice/docker-compose.yml
Add it in place of [onlyoffice secret] and also remove the '#' that's commenting out the line - again, thanks to Stephen Harlow for pointing out that this is required! Then restart OnlyOffice via
docker-compose up -d
Docker will see that the container's configuration has changed and will restart the container.
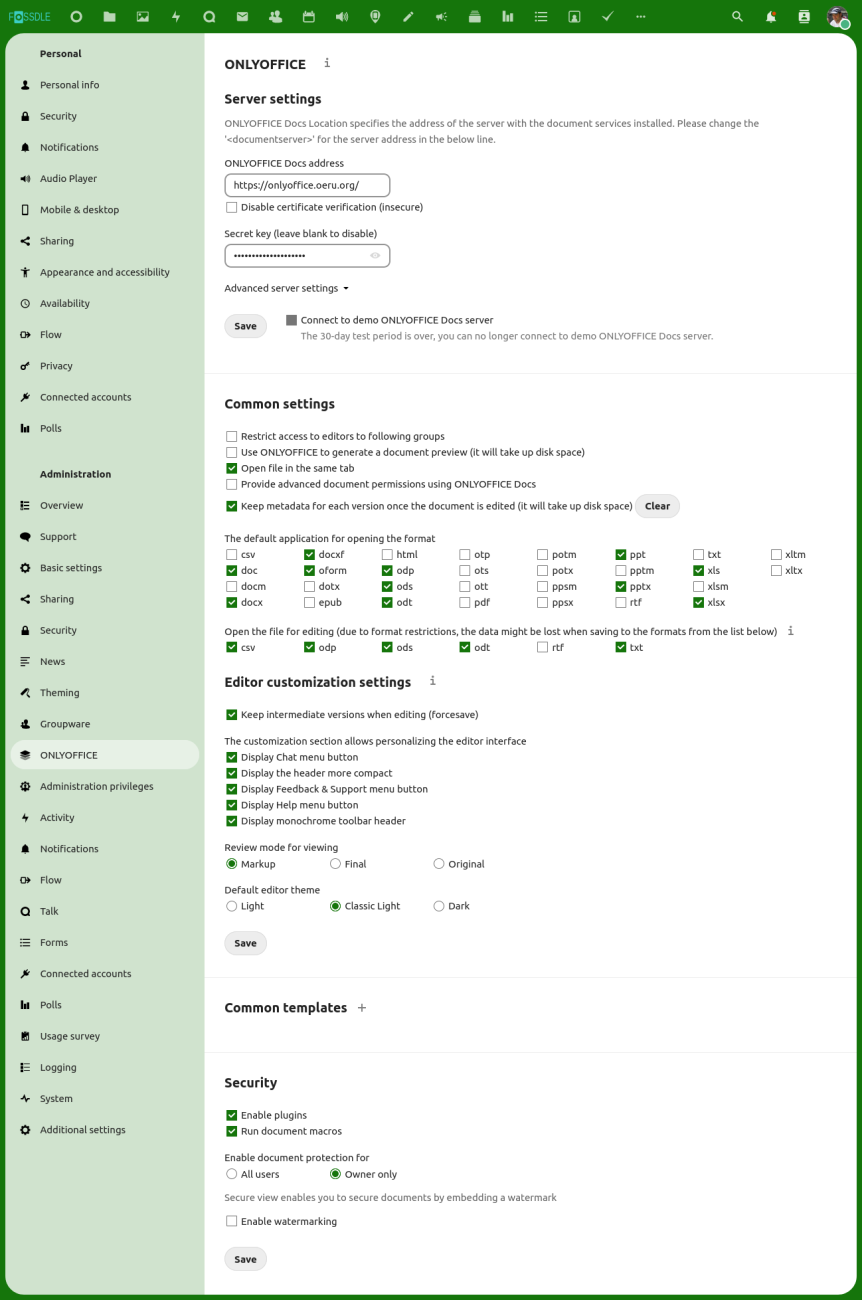
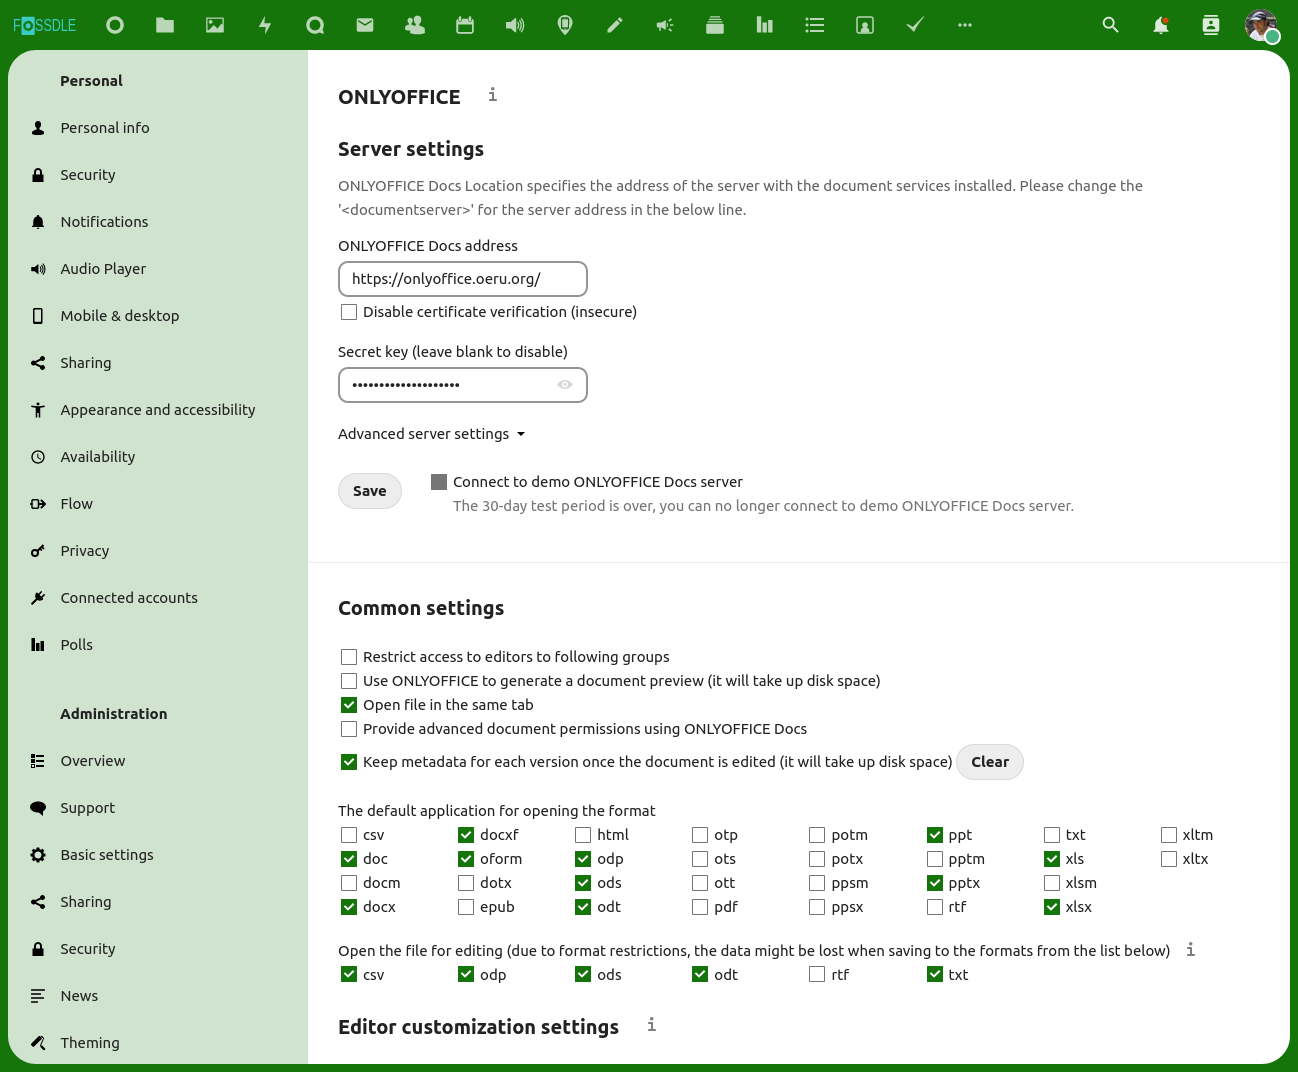
Next you need to be logged into your NextCloud as an administartive user (your own user is fine if you've given it admin privileges).
You should have an "admin" menu (assuming you've created your user with Administrator privileges) at the top right of the web interface. If you go to Apps, you can install the new "Hub bundle" available under the "App bundles" option (see attached image). If you don't want the whole bundle you can just use the search box to search for "OnlyOffice" or go to the "Office & text" App category and enable the OnlyOffice "official" app, at which point it will automatically download the latest version of the connector app and install it (it should appear in your /home/data/nextcloud/apps directory)
Once you've done that, go to your top right menu again, selecting Admin, and you should see "OnlyOffice" as an option in the left column (which starts with "Basic settings"). Selecting that, you'll need to enter the following:
You don't need the 'advanced settings'.
When you're done, click "Save".
You can also select formats you'd like OnlyOffice to open and edit files of those types are clicked or created. I've selected the following: doc, docx, odp, ods, odt, ppt, pptx, xls, xlsx, and in the second section: csv and txt.
You can also make other editor customisations as you desire. The only Editor customisation setting I haven't selected is "Display Chat menu button" because NextCloud Hub provides an integrated Chat service, making this one within OnlyOffice an unnecessary distraction.
Once finished configuring, you should have the ability to go back to the home of your NextCloud install, which should show you your top-level folders. If you click the "+" next to the home icon (top left of the folder pane) you should now have the option to create (in addition to "Upload file", "New folder", "New text file") a "New Document", "New Spreadsheet", and "New Presentation". Clicking those should give you the OnlyOffice interface for the designated content type.
Similarly, you can use the "Upload file" to upload a document in a format that is supported by OnlyOffice. Once uploaded, clicking on the filename should open it for editing in the appropriate OnlyOffice interface.
It is saved as it is changed, so you shouldn't need to save it explicitly.
Keeping the whole thing up-to-date
So, as you're no doubt aware, both NextCloud and OnlyOffice are always being improved and updated. I certainly encourage you to keep your installations up-to-date.
While you'll periodically be alerted that NextCloud apps have available updates (these can be upgraded through the browser interface) updates to the NextCloud and OnlyOffice systems themselves need to be undertaken by upgrading their containers. Luckily it's easy to do although I strongly urge you to ensure you have a very recent backup of both database and uploaded files - they're the files in /home/data/nextcloud/data and /home/data/onlyoffice/ (note, backups of OnlyOffice are complicated somewhat by the fact that you can't reliably back up running PostgreSQL instance simply by backing up its files - see a solution below). Prior to updating my containers, I normally create an archive of my NextCloud code in the event the upgrade goes wrong and I need to recover quickly. I do it like this. In my /home/data/nextcloud directory, I create a new 'attic' directory:
cd /home/data/nextcloud && sudo mkdir attic
then I create an archive of my entire NextCloud source directory in the attic directory:
DATE=date +%Y%m%d && sudo tar cvfz attic/nextcloud-${DATE}.tgz --exclude "data" nextcloud
If you need to recover files from it, you can untar it (assuming you have sufficient disk space! Best to be mindful of that!) via
sudo mkdir tmp && cd tmp && tar xvfz ../attic/nextcloud-${DATE}.tgz
although if you're doing it in a different SSH session (e.g. after the fact) you might have to manually enter the DATE part of the filename.
Once you've got a backup of your NextCloud source code, updating the container should be as easy as either doing another
docker-compose pull
and then restarting the service with the new containers via
docker-compose up -d
which will remove any old containers (this won't remove any data you want to save if you followed the directions above! But remember to do it in the right directory!) and start up the new versions you've just pulled.
Use docker-compose logs -f to watch the logs - you'll likely see useful debugging information in the unlikely event that something goes wrong in the upgrade process.
Backing up NextCloud
To back up your instance on your server, you need two things: a file system backup of your /home/data/nextcloud directory, and database dumps of your database.
There're lots of ways to back up your files (I've recently updated to using a system called Restic to make off-server incremental encrypted backups - I plan to document this in a future howto! - although there're other documented approaches - leave a comment below if you'd like to learn more about my approach!).
Backing up your MariaDB databases is as easy installing automysqlbackups:
sudo apt install automysqlbackups
You'll find daily versioned dumps of your MariaDB database(s) in /var/lib/automysqlbackups on your VM host's filesystem. To run an ad hoc backup (which will replace the previous backup from that day, if there is one) just run
sudo automysqlbackups
Backup OnlyOffice
Along with backing up the files in your /home/data/onlyoffice directory, you'll also want a proper "dump" of your PostgreSQL backup (you can write simple bash scripts to do this regularly, automatically), particularly prior to doing an upgrade (to allow for recovery if something goes badly wrong, which is always possible). You can achieve this by going to
cd /home/docker/onlyoffice
and running this
DATE=$(date +%Y%m%d) && FILE=/home/data/onlyoffice/backup/fullbackup-${DATE}.sql && docker-compose exec onlyoffice sudo -u postgres pg_dumpall > ${FILE} && gzip ${FILE}
which will assign the current date to DATE, the relevant filename to FILE, and then put the backup SQL into a dated file called $FILE and compress the result with gzip :)
At some point, I'll modify my normal versioned PostgreSQL-in-a-Docker-Container dated database backup scripts to cater for this solution and make the result available on https://git.oeru.org - it'll probably be a small modification to this script: https://git.oeru.org/oeru/docker-compose-dbbackup in case someone wants to beat me to it!
Add new comment