Installing Rocket.Chat with Docker on Ubuntu Linux 14.04
Rocket.Chat is a modern, open source messaging application which is functionally similar to a popular (and heavily marketed) proprietary tool called Slack. Rocket.Chat is built on a powerful open source real-time collaboration platform called Meteor (which, in turn, is built on the Node.JS open source framework), which supports real-time collaborative applications. The real-time collaboration means that if multiple people are using an app at the same time, even if they're spread across the world, they'll see the changes others are making in real-time.
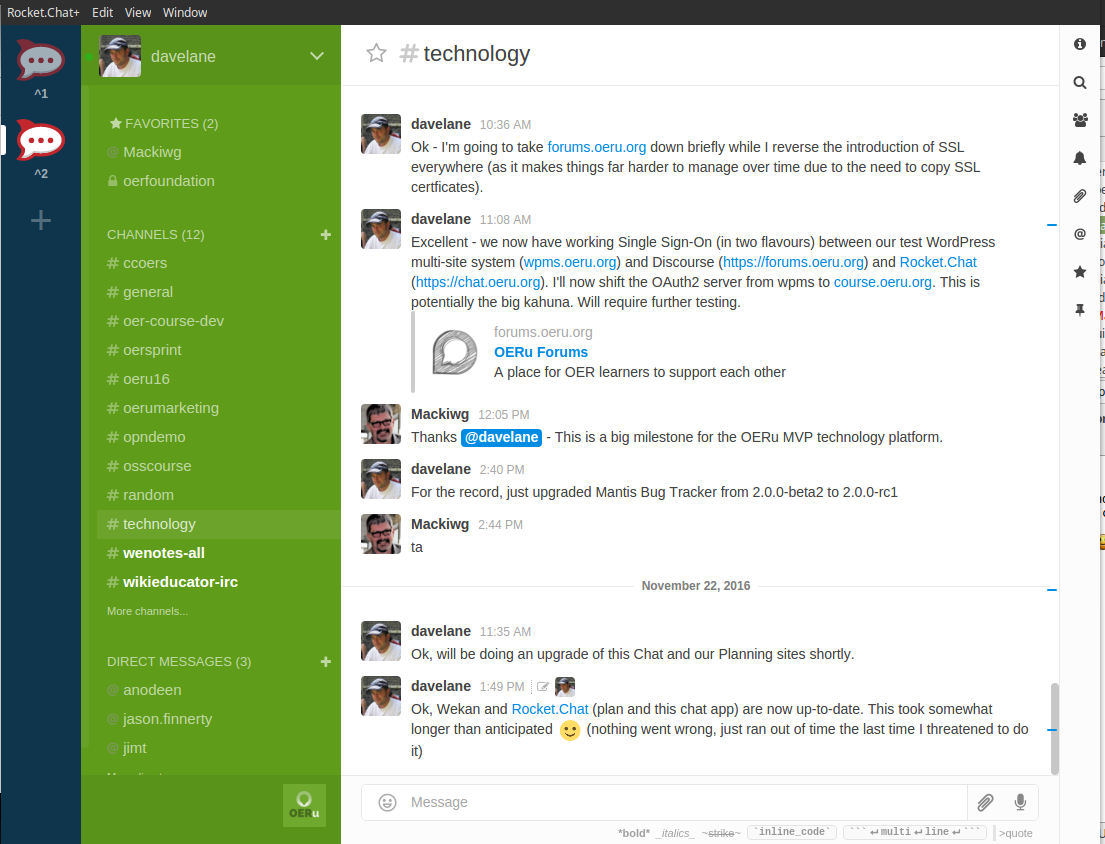
The OERu has a Rocket.Chat instance that has been getting very positive feedback from our Open Education Resource designers and collaborators, who use it to communicate with us at the OER Foundation, and with their fellow collaborators. There are currently about 20 channels to which users can subscribe and in which they can participate, dedicated to different topics of discussion.
Rocket.Chat instances store their data in another open source tool, a key-value storage engine called MongoDB - these instructions assume that you have already got a running MongoDB installed, and to facilitate that, we've provided this handy MongoDB install guide as a companion.
This guide will cover both configuring and launching a Docker container with a working instance of Rocket.Chat. It will, in turn, be linked to another Docker container running MongoDB, and both will be capable of sending email via external authenticating email server. External user access to Rocket.Chat is provided by the Nginx web server (as a forward proxy). User interaction with Rocket.Chat is (and should always be) encrypted via recognised SSL certificates using the brilliant (and gratis) Let's Encrypt service.
This instruction set assumes that you have command-line access (via SSH, in most cases) to your server, running Ubuntu Linux 14.04, probably a Virtual Machine hosted in a data centre somewhere - a very inexpensive way to do this is, for example, via DigitalOcean (for the record, we have no relationship with DigitalOcean, I simply have substantial experience with their services), but there are many many options worldwide. These instructions will need to be modified slightly for other versions of Linux (e.g. Debian 8 or Ubuntu 16.04 or CentOS or others), but should be mostly valid. We'd be grateful to hear about anyone else's experiences in the comments below!
Installing Docker
See our instructions in the MongoDB blog post.
Installing Rocket.Chat
First, we would normally create a rocketchat user to create a place for any persistent data required for the app:
sudo adduser rocketchat
Although Rocket.Chat stores almost everything in the MongoDB you've already set up, it can store uploaded files in a designated directory so they survive updates to the Docker image:
sudo -u rocketchat mkdir /home/rocketchat/uploads
Assuming you've got Docker installed properly, to install the official Rocket.Chat Docker image, you can just run:
docker pull rocketchat/rocket.chat
Then you can launch it by running this by first launching your MongoDB container, and then running this (assumes you've named your MongoDB instance "mongodb" as per our instructions):
docker run -d --name rocketchat -p 8051:3000 \

         -h [your_RocketChat_domain] \

         -v /home/rocketchat/uploads:
/var/www/rocket.chat/uploads \
-e "MAIL_URL=[outgoing_mail_server]" \
--link mongodb:mongo -e "MONGO_URL=mongodb://mongo/chat" \
-e "ROOT_URL=http://[your_RocketChat_domain]" \
--restart unless-stopped rocketchat/rocket.chat
Note: Please copy and paste the exact text of your "docker run" command into a reference file (I usually have a "README.oeru" reference file in the home directory of each Docker-based app I run) as you will want to refer to it when doing upgrades!
You'll need to make sure you set appropriate values for [your_RocketChat_domain] and details for an SMTP (outgoing mail) server, because Rocket.Chat needs to send emails related to things like account registration, forgotten passwords, and configurable notifications, for example to alert you that you've been mentioned in discussions.
You can use either a local mail server on the Docker host, in which case you'd put the local IP address of your server, as it would be seen by the Docker container, so 172.17.42.1 is the default IP of a Docker host. You could also use an authenticating SMTP server, and specify the details like this: smtp://[username]:[password]@[IP-or-domainname]:[port, usually 25, 465, or 587]. Here's a what a made-up example might look like:
-e "MAIL_URL=smtp://smtpmail:blahdiblah88@mail.oeru.org:25"
Note, the --restart unless-stopped will ensure that this container is restarted on a reboot unless it's explicitly stopped, like via a docker stop rocketchat, like you might to update the Docker container.
Setting up Nginx as a proxy server
Having set up the Docker container, which is listening on port 8051 on the Docker container's host, you'll need to set up a reverse proxy on that host to make the site visible to the broader internet on your public IP address (you'll want to make sure the domain you specified above points to that IP address or is a CNAME to a domain that does).
Once you've got that, you can proceed. In /etc/nginx/sites-available, I create a file called plan (as we use plan.oeru.org as our domain). Note, I use "vim" as my text editor. If you don't know it, perhaps use "nano" instead. It's much less powerful, but easier to use...
sudo vim /etc/nginx/sites-available/chat
Here're the contents - you'll want to change the domain name to suit your own choices. Similarly the names of SSL files and logs. The following file has a chunk in the middle commented out with "#s". More on that below:
server {
        listen 80; # this is one of our external IPs on the server.

        #listen   [::]:80 default ipv6only=on; ## listen for ipv6


        root /usr/share/nginx/www;

        index index.html index.htm;


        server_name chat.oeru.org;


        access_log /var/log/nginx/chat.oeru.org_access.log;

        error_log /var/log/nginx/chat.oeru.org_error.log;


        location /.well-known {

                root /var/www/html;

                default_type text/plain;

        }


#        location / {

#                return 301 https://chat.oeru.org$request_uri;

#        }

#}

#

#server {

#        listen 443 ssl;

#        ssl on;

#        ssl_certificate /etc/letsencrypt/live/chat.oeru.org/fullchain.pem;

#        ssl_certificate_key /etc/letsencrypt/live/chat.oeru.org/privkey.pem;
# ssl_protocols TLSv1 TLSv1.1 TLSv1.2;
# ssl_dhparam /etc/ssl/certs/dhparam.pem;
# keepalive_timeout 20s;
#
# access_log /var/log/nginx/chat.oeru.org_access.log;
# error_log /var/log/nginx/chat.oeru.org_error.log;
#        root /var/www/html;

#        index index.html index.htm;
#        server_name chat.oeru.org;

#

#        location /.well-known {

#                root /var/www/html;

#                default_type text/plain;

#        }
        location / {

                proxy_read_timeout      300;

                proxy_connect_timeout   300;

                proxy_redirect          off;

                proxy_set_header    Host                $http_host;

                proxy_set_header    X-Real-IP           $remote_addr;

                proxy_set_header    X-Forwarded-For     $proxy_add_x_forwarded_for;

                proxy_set_header    X-Forwarded-Proto   $scheme;

                proxy_pass      http://127.0.0.1:8081;

        }
}
When you've set up the file, you can enable it:
sudo ln -sf /etc/nginx/sites-available/chat /etc/nginx/sites-enabled
Test the file to ensure there aren't any syntax errors before reloading nginx:
sudo nginx -t
If this shows an error, you'll need to fix the file. If all's well, reload nginx to include the new configuration:
sudo service nginx reload
You should now be able to point your browser at your domain name, and you should get your Rocket.Chat site via the HTTP (not encrypted) protocol.
A word to the wise - if it doesn't work, check your firewall settings!
In the next step, we'll sort out your SSL certificate from Let's Encrypt.
Protecting your users
Have a look at our Let's Encrypt howto.
Upgrading Rocket.Chat
You should periodically upgrade Rocket.Chat, say every couple months, to benefit from improved features... The upgrade process usually means a few minutes of down time for the site, so pick a time when it isn't likely to be heavily used... You'll normally want to upgrade any dependent Docker containers at the same time (like your MongoDB and Wekan) so we have a dedicated Upgrade article for that.
Add new comment