Installing BigBlueButton on an OERu Docker Server


This tutorial was developed for the Samoan Knowledge Society Initiative, in which the OER Foundation is very pleased to be involved. (Update 2022-02-10: we have also created a video tutorial based on this written tutorial)
BigBlueButton (BBB) is a full-featured video conferencing system designed for large scale remote learning at the university level. In some ways, BBB goes beyond feature parity with widely used proprietary video conferencing systems like Zoom or Microsoft Teams, Webex, or Google Hangouts. It's main differences are that BBB
- was designed from the gound up for educational use, and
- is Free and Open Source Software (FOSS) and anyone can install it (as we describe in this tutorial) at no cost other than whatever cost you pay for hosting the application and a bit of your time.
You can read all about BigBlueButton and how it works using the excellent documentation provided by its development community.
There are no per-user license fees (or any fees), and your users don't need to install special software, vastly simplifying its adoption: BBB works brilliantly on any desktop computer, laptop, or mobile device (tablet or phone) with a modern web browser that implements the WebRTC open web standard (which is all modern browsers).
The source code for BBB's internal components, and its many ancillary tools is available for anyone to learn from or improve - that's the fundamental benefit of FOSS. Since the outbreak of COVID19, the team at a small Ottowa, Canada-based company, Blindside Networks, has been working tirelessly with the BBB community to improve the BBB code, which is being used all over the world by millions of people every day.
This tutorial walks you through provisioning and building your own BigBlueButton instance on a server running Ubuntu GNU/Linux - version 20.04 is the Long Term Support (LTS) version as of this writing - using Docker containers for the various software services and components, with the containers managed by Docker Compose.
Table of contents
Introduction
References
For this tutorial, we are using a Digital Ocean 'Droplet' as our cloud server. You can use an almost identical process to provision a server from any one of a thousand other commodity GNU/Linux cloud hosting providers.
To demonstrate the process of defining a sub domain and its IPv4 and IPv6 addresses (via A and AAAA records respectively) I'm using my preferred local domain registrar Metaname (based here in Christchurch, New Zealand, as am I. I know the developer/owner of the service and I trust him). You can use any domain registrar that gives you the ability to configure your 'DNS zone file'. Some of might have your own DNS server or institutional name servers, in which case you might have to request these changes be made on your behalf.
Copying and pasting
We will be providing a bunch of command lines that you can copy and paste into a terminal on the computer you're using to access your virtual server. Links like
this one
are intended for you to copy and paste into the command line. On Linux, please note that in some cases if "CTRL-V" doesn't work to paste, try using "CTRL+SHIFT+V" (that's because in some terminals, "CTRL+V" had a pre-existing purpose as terminals have been around since long before desktops and 'copy-paste" were invented and the arbitrary CTRL-C, CTRL-X, CTRL-V key combos were chosen by Microsoft without any consideration for prior art). Similarly, if you want to copy from a terminal, you might need to use "CTRL+SHIFT+C". Try it.
When we ask you edit a file (using the editor you choose to assign to the EDIT shell variable below), we expect you to complete the recommended changes, and then save the file and exit back to the command line.
We'll aim to show you what to change using a 'code' box:
Information you need to know
Info you need to have handy to complete this tutorial:
- You need to know the IPv4 address of your server. Token: [IPv4] - it'll be in the form of nnn.nnn.nnn.nnn where nnn = 0-254, example value 143.110.228.88
- If your server has one, you need to know its IPv6 address. Token: [IPv6] - it'll be in the form of hhhh:hhhh:hhhh:hhhh:hhhh:hhhh:hhhh where h = 0-9a-f, i.e. a hex value, example 2604:a880:4:1d0::402:b000
- You need to have a domain name (or a sub domain name) to point at your server's IPv4 and IPv6. Token: [Domain], example domain bbbtest.milll.ws (in this case, bbbtest is the subdomain of the milll.ws domain)
- The email address your server should send status or admin-related email to. Token [Admin email], example webmaster@[Domain]
- You'll need a set of authenticating SMTP account settings including - these can be used both on the host and in the BBB installation:
- [SMTP server] - the domain name or IP address of an existing SMTP server, e.g. about.oerfoundation.org (our one), or smtp.googlemail.com,
- [SMTP port] - the port number for the service you're using. It'll usually be one of 587 or 465. Older, unauthenticated SMTP servers used to use port 25, but that's now blocked by most ISPs due to its abuse by spammers.
- [SMTP security] - usually this'll be something like 'SSL' (usually associated with port 465) or 'StartTLS' (usually associated with port 587).
- [SMTP username] - the username - often an email address - for the authenticating SMTP service, and lastly,
- [SMTP password] - the password accompanying the username.
- You'll want an email address that you can check to send test emails to: token [Test email], e.g. you@youremailprovider.tld, and finally
- You'll want a 'from' email address that users of your system will see when they get emails from you. Token: [Outgoing email], e.g. notifications@milll.ws.
Preferences
You'll need to copy and paste the following lines into any terminal you're using to complete this tutorial, so that that session is aware of your preferred values:
EDIT=$(which nano)
SITE=bbbtest.milll.ws
We're going to reference these periodically in the following process, so it's important you set these correctly. To verify them, you can run this in any terminal at any time to verify that the values are still defined and current:
echo "Our variables = $EDIT and $SITE"
Set up your virtual server
You'll need to log into your cloud service provider's dashboard - in our case, we've used DigitalOcean. That means pointing our browser to https://digitalocean.com and either using "Log In" (if we already have an account) or "Sign Up" (if we don't).
Once you're logged in, you'll want to go to 'Create' and select 'Droplets' (Digital Ocean calls each of their virtual servers a "Droplet").
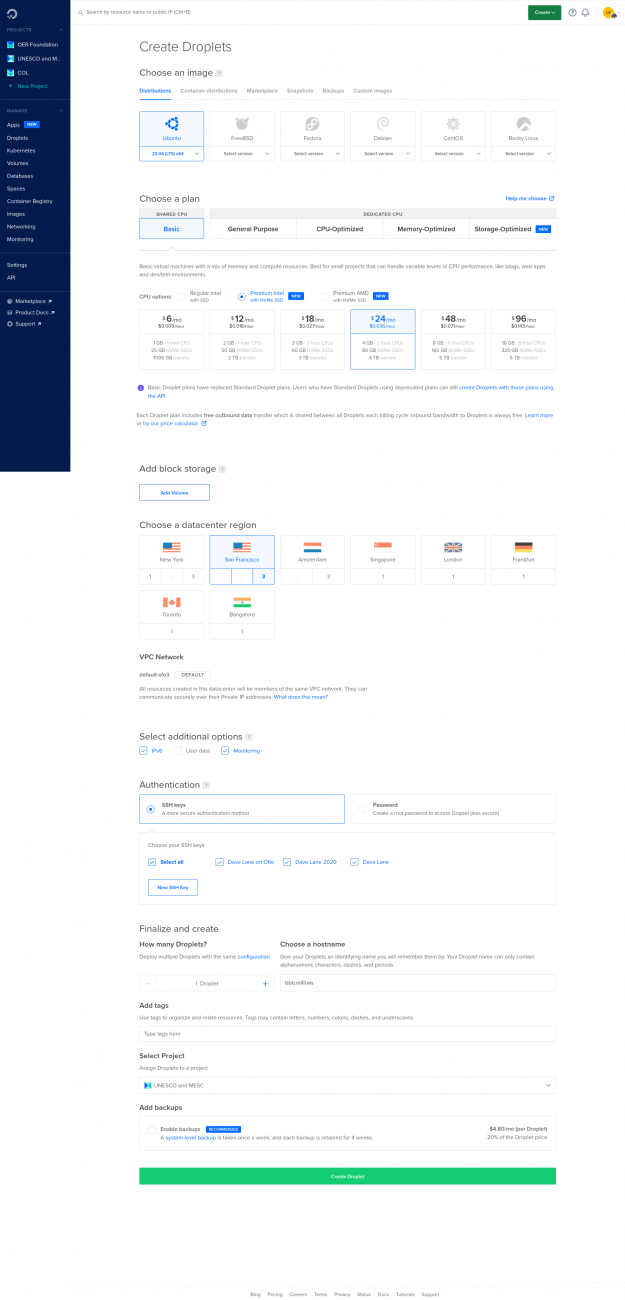
We've included a screenshot of the Create Droplet page, with the relevant options selected. They are as follows:
- Choose an image: we choose 'Ubuntu 20.04 LTS'
- Choose a plan: we choose 'Basic'
- for CPU options: we choose 'Premium AMD with NVMe SSD'
- for the size, we choose either the '$24/mo' (choose the '$48/mo' option if you want to be able to support large groups, like 100+ simultaneous participants).
- Choose a datacenter region: we choose 'San Franciso, zone 3' (which we've determined to be in the 'centre of the internet', i.e. the most central point to give the best website performance to a global audience. You might want to try a different place depending on your location in the globe and your audience).
- VPC Network - we just leave the default.
- Select additional options: we check 'IPv6' and 'Monitoring' but not User data.
- Authentication: if we have added one or more SSH keys to our DigitalOcean profile select 'SSH keys'. If not, you can select 'Password'. It's far more efficient and secure to use SSH whereever possible.
- We're ony creating 1 Droplet and we Choose a hostname of [Domain]
- We don't need to add any tags
- We won't Add backups.
Then we can Create Droplet...
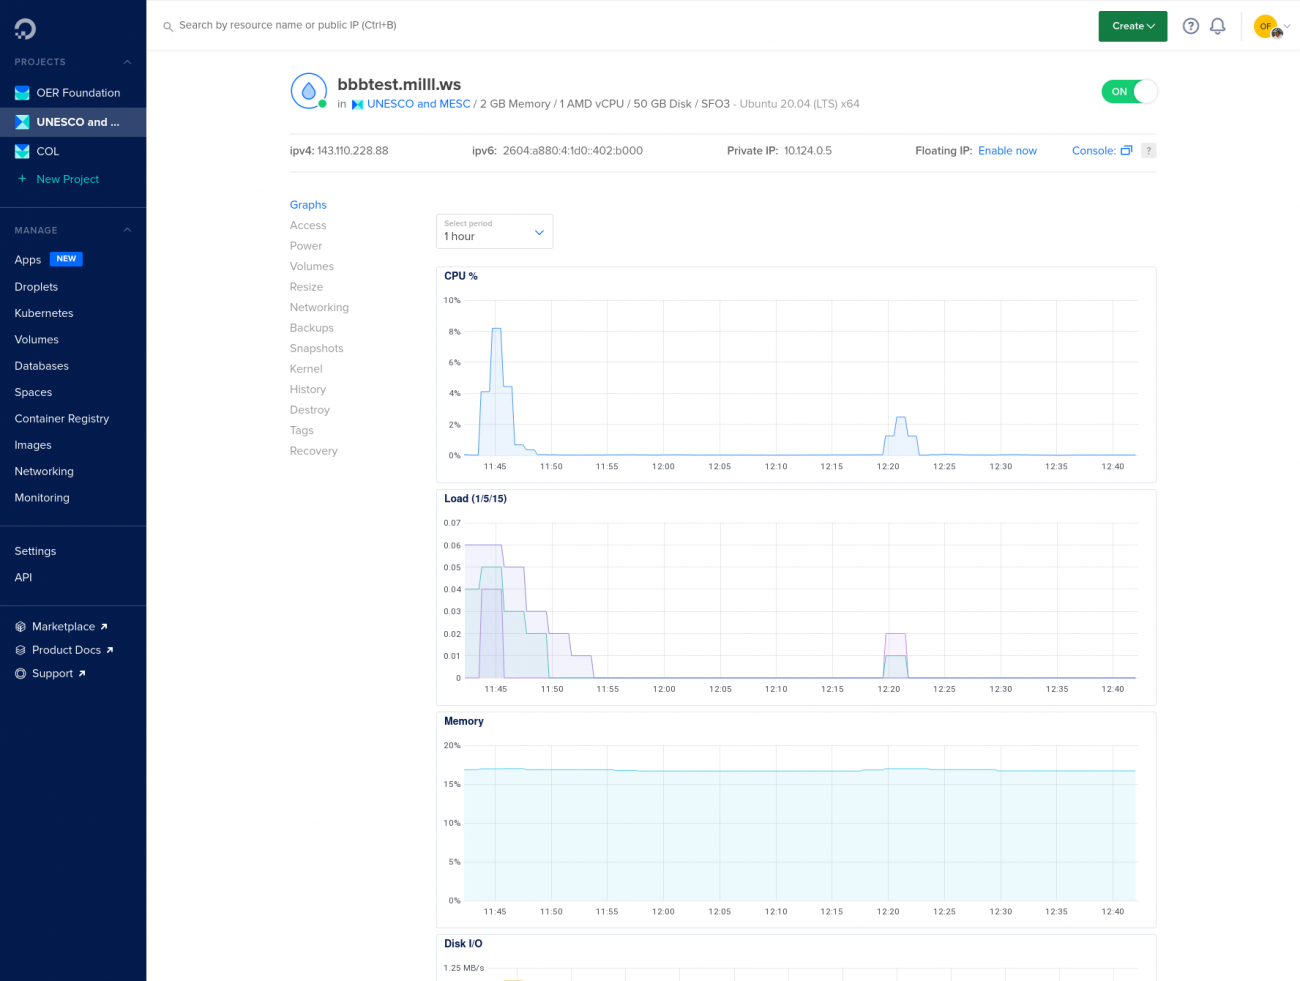
When the Droplet is finished, we can get the [IPv4] and [IPv6] addresses.
We can also either log in via the command line from a local GNU/Linux or UNIX (e.g. MacOS) terminal or via a graphical SSH client (on Microsoft Windows, most people use Putty) via ssh root@[IPv4] or ssh root@[IPv6] (replacing those tokens with their actual IPv4 or IPv6 addresses). If we've set a key, we should get logged in without the need to enter any passwords. If not, we have to enter a password provided by DigitalOcean.
Configure your Domain to point at your Server
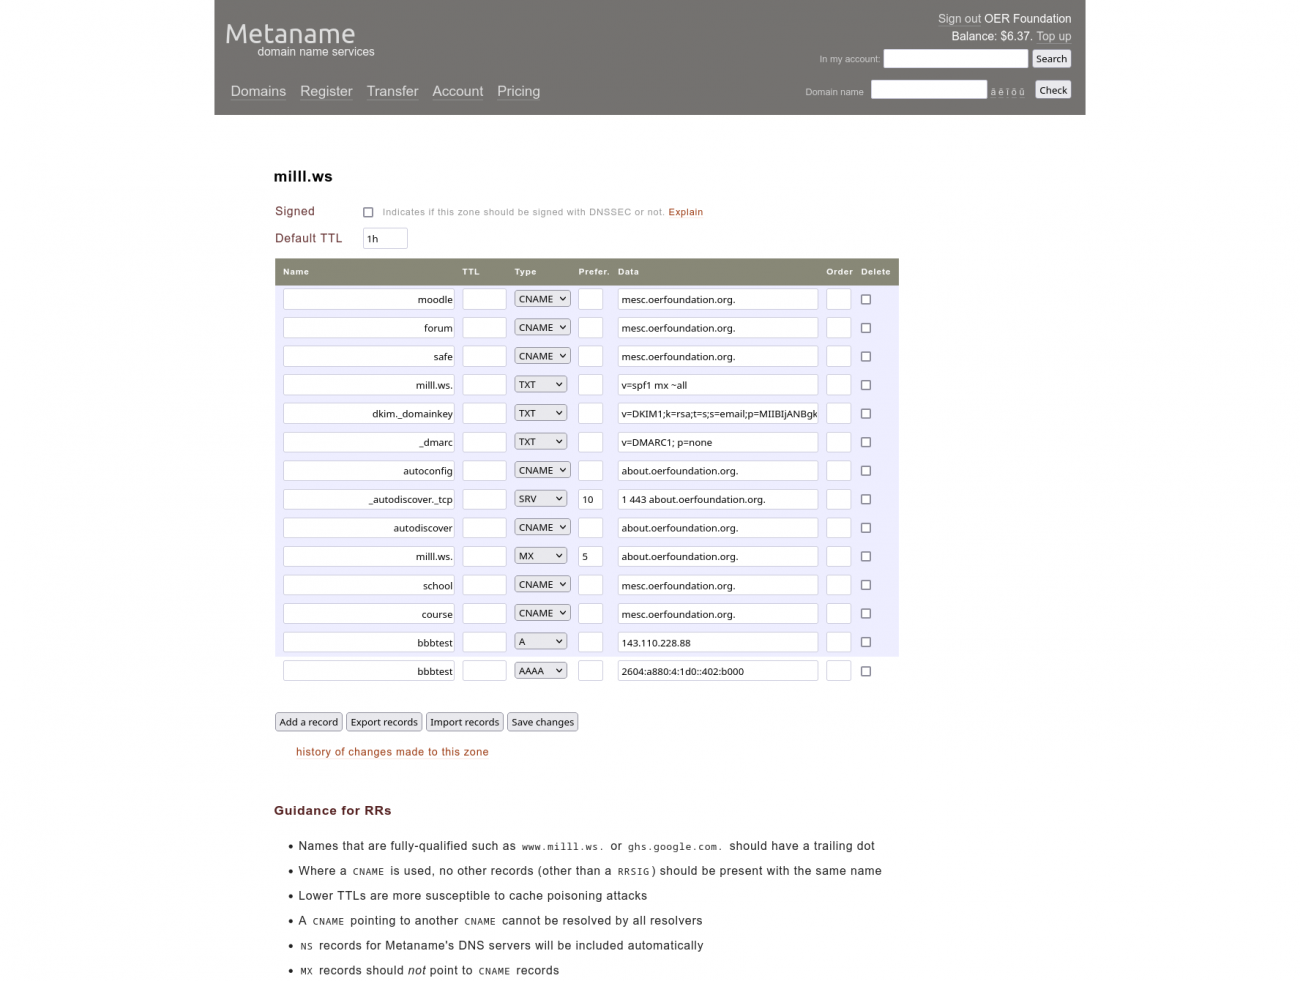
Once you have selected and registered your domain with a domain registrar - we are using Metaname - you can set up (usually through a web interface provided by the registrar)
- an "A Record" which associates your website's name (your [Domain], e.g. milll.ws, or a subdomain of that domain, e.g. bbb.milll.ws, where 'bbb' is the subdomain part) to the IPv4 address of your server. You should just be able to enter your server's IPv4 address, the domain name (or sub-domain) you want to use for your server.
- if your registrar offers it it's also important to define an IPv6 record, which is called an "AAAA Record"... you put in the same domain name or subdomain and then your IPv6 address instead of your IPv4 one.
I've attached an screenshot of the Metaname interface for configuring these DNS zone records.
You might be asked to set a "Time-to-live" (which has to do with the length of time Domain Name Servers are asked to "cache" the association that the A Record specifies) in which case you can put in 3600 seconds or an hour depending on the time units your interface requests... but in most cases that'll be set to a default of an hour automatically.
Once your domain A and AAAA records are configured, you should be able to log into your server via ssh root@[Domain], or, for example, ssh root@bbb.milll.ws. Although it should be instant, depending on your registrar, it might take as long as a few hours (even 24) for your domain name assignments to propogate through the DNS network and be available on your computer.
Best Practice: access your server as a non-root user
You should be able to test that your A and AAAA Records have been set correctly by logging into your server via SSH using your domain name rather than the IPv4 or IPv6 address you used previously. It should (after you accept the SSH warning that the server's name has a new name) work the same way your original SSH login did. On Linux, you'd SSH via a terminal and enter ssh root@[domain name]. I think you can do similar on MacOS and on Windows, I believe people typically use software called Putty...
But this will log you into your server as the 'root' user.
It's not considered good practice to access your server as root (it's too easy to completely screw it up). Best practice is to create a separate 'non-root' user who has 'sudo' privileges and the ability to log in via SSH. If you are currently logged in as 'root', you can create a normal user for yourself via (replace [username] with your chosen username):
U=[username]
adduser $U
You will be required to set a password for the user here. Then you can add the new user to several relevant groups that confer the required administrative capabilities.
adduser $U ssh
adduser $U admin
adduser $U sudo
If you want to change the password for user [username] you can run:
passwd $U
then become that user temporarily (note, the root user can 'become' another user without needing to enter a password) and create an SSH key and, in the process, the .ssh directory (directories starting with a '.' are normally 'hidden') for the file into which to put your public SSH key:
su $U
ssh-keygen -t rsa -b 2048
nano ~/.ssh/authorized_keys
and in that file, copy and paste (without spaces on either end) your current computer's public ssh key (never publish your private key anywhere!), save and close the file.
From that point, you should be able to SSH to your server via ssh [username]@[domain name] without needing to enter a password.
These instructions use 'sudo' in front of commands because I assume you're using a non-root user. The instructions will still work fine even if you're logged in as 'root'.
The rest of the tutorial can be run as your 'sudo-capable' non-root user.
A few post-install updates
Update the server's hosts file
This is required due to some quirks of the auto-detection of your domain name used by BigBlueButton - you'll need it later.
sudo $EDIT /etc/hosts
and add (or make sure it already has) the following:
For example - my test system has these details:
Do an initial post-install update to the latest software versions:
sudo apt-get update && sudo apt-get dist-upgrade
and add a couple useful apps that, for example, track changes to our system configuration for future reference (etckeeper) and allow us to do network troubleshooting (net-tools):
sudo apt-get install -y etckeeper net-tools
We also want to enable console logins in the event we have trouble using SSH:
wget -qO- https://repos-droplet.digitalocean.com/install.sh | sudo bash
Firewall Configuration
We need to configure firewall for admin access via SSH and access to internet for Docker containers
sudo ufw allow OpenSSH
sudo ufw allow in on docker0
sudo ufw allow from 172.0.0.0/8 to any
Then we need to adjust the default firewall policy:
sudo $EDIT /etc/default/ufw
You'll find this:
which you need to change to
Next you need to edit this file
sudo $EDIT /etc/ufw/sysctl.conf
And change (near the top of the file):
to
(removing the "#" uncomments those lines)
Next, you have to restart the server's networking stack to apply the changes you've made:
sudo systemctl restart systemd-networkd
Luckily, this is generally instantaneous, so your connection to your server shouldn't be interrupted.
Then you either start or (if it's already running for some reason) restart the firewall
sudo ufw enable
or
sudo service ufw restart
(running both won't do any harm)
And we also update the firewall configuration to tell it to automatically start at boot time.
sudo $EDIT /etc/ufw/ufw.conf
Change ENABLED=no to ENABLED=yes.
Next we need to set up some specialised rules for the "COTURN" functionality of the BigBlueButton system. COTURN is a FOSS application that provides both TURN and STUN (video) (alternative non-video reference) functionality which are core to the WebRTC protocol on which modern video conferencing applications are built, and are necessary for your users to connect their audio and video to a session, particularly if they're behind an institutional firewall.
Note: in some cases, institutions will have implemented a rather over-the-top-paranoid 'default deny' for video conference hosts which will block access to your BBB instance unless you can get them to add your site's domain name to their institutional whitelist. Sadly, there's no easy way around this.
sudo ufw allow 7443/tcp
sudo ufw allow 16384:32768/udp
sudo ufw allow 3478/udp
sudo ufw allow 5349/tcp
sudo ufw allow from 10.7.7.0/24
Ok, that's it for the firewall shenanigans.
Install Postfix so the server can send email
It's generally a good idea to make sure any server you build can send email, and has a sensible default email address to send stuff to: stuff like administrative messages alerting you to failed tasks, or other system problems. We recommend that you designate an email address for whoever's responsible for this server. We've got a more comprehsensive howto for setting this up if you're wanting extra details.
We achieve the outgoing mail functionality using the industrial strength Postfix SMTP server (it's widely used by ISPs for large-scale email services) along with a command line SMTP client that allows us to test our solution from the command line:
sudo apt install postfix bsd-mailx
During this installation, you'll be asked by the installer to make some decisions to do preliminary configuration of the Postfix installation. Select the default asnwers except as follows:
- Select "Internet Site with Smarthost",
- fill in the [Domain] name you've chosen for your server,
- the domain name or IP address and port (in the form [SMTP server]:[port], examples might be smtp.oeru.org:465, or 10.11.143.22:465) of your "smarthost" who'll be doing the authenticating SMTP for you - note: our configuration works with port 465, and
- the email address to which you want to receive system-related messages, namely [Admin email].
Once that's installed, we need to set up our default email address for this server:
sudo $EDIT /etc/aliases
This file will containerd
update it to include an email address to send stuff intended for the system admin (aka 'root'):
after writing that, we have to convert that file into a form understood by Postix:
sudo newaliases
Next, we need to create a new file with the SMTP 'relay host' aka 'smart host' details:
sudo $EDIT /etc/postfix/relay_password
In it you need to put the following:
Here's an example:
Once you've set that up, we have to again prepare that file for use by Postfix:
sudo postmap /etc/postfix/relay_password
Finally, we need to update Postfix's main configuration to tell it to use our authenticating SMTP details:
sudo $EDIT /etc/postfix/main.cf
You'll need to make main.cf look like this - specifically commenting out smtp_tls_security_level=may by adding a '#' at the start of the line, and then adding the details below # added to configure accessing the relay host via authenticating SMTP. You should also take this opportunity to confirm that your
[Domain], [SMTP server] and [SMTP port] are set correctly.
Here's an example of what the final code could look like (don't use these exact values as they won't work for you):
First, I commented this out:
Made sure this was my [Domain]
Made sure this had my [SMTP server] and [SMTP port] details:
And I added this at the end:
After this, the Postfix configuration is done. We can check that we haven't got any typos via
sudo postfix check
If not, we can apply our configuration changes:
sudo postfix reload
and we can confirm it all worked correctly by checking the log file for Postfix:
sudo less +G /var/log/mail.log
Note: you might see a warning like this: postfix/postfix-script: warning: symlink leaves directory: /etc/postfix/./makedefs.out - it's spurious and you don't need to worry about it.
Email test
Next we can test our outgoing SMTP by sending a test message via the command line - use a test email that you can check!:
mail [Test email]
for example:
mail demo@oerfoundation.org
After you hit Enter, you'll be shown
Subject: {Enter an email subject, e.g. "Test email from [Domain]"}
After that, hit Enter, and you'll be shown a blank line. On that line:
{Enter your email text, e.g. "This is just a test."}
Then, to finish your email, type CTRL-D which will show you another line
CC: {Enter any CC email addresses, e.g. mybackupemail@anotherprovider.tld }
After you hit Enter, your email should be sent if all your configuration options are accepted by your remote host (the SMTP server at the address [SMTP server] with all the other details you entered).
You can check if it worked by looking at the Postfix log again:
sudo less +G /var/log/mail.log
If it sent the email, you'll see something like (but with different IP addresses, serial numbers, and addresses) - the key bit is the status=sent bit and the 250 code from the SMTP server:
You can also check for receipt of email and verify receipt (note, if you don't get it quickily, check your email spam folder).
Install Nginx webserver and Let's Encrypt tools
sudo apt install -y nginx-full ca-certificates letsencrypt ssl-cert
You need to tell your firewall to open the ports that the Nginx webserver will use:
sudo ufw allow "Nginx Full"
And then we need to create a special configuration for Let's Encrypt and then an identify verification directory:
sudo mkdir /etc/nginx/includes
sudo mkdir /var/www/letsencrypt
To create the specific configuration, we create this file:
sudo $EDIT /etc/nginx/includes/letsencrypt.conf
And fill it with this information:
We'll reference this file in our Nginx configuration file for the reverse proxy functionality.
Set up COTURN certificates
In preparation for creating our Let's Encrypt SSL certificate for our [Domain], we're going to set up a 'hook' which is triggered when our SSL certificate is created, and it copies our current certificate to a place where the COTURN server can find it.
sudo $EDIT /etc/letsencrypt/renewal-hooks/deploy/coturn.sh
Copy and past the following into your file (replacing [Domain] with your domain name):
Next, make that script executable:
sudo chmod a+x /etc/letsencrypt/renewal-hooks/deploy/coturn.sh
so that it is run automatically anytime the relevant certificate is created or renewed.
After that, we have to create a place for the COTURN-specific certificates to go:
sudo mkdir /etc/coturn-ssl
Set up Nginx Reverse Proxy Configuration
Next we have to set up our Nginx webserver on our virtual server, which will be the Docker container host for our BigBlueButton system. The reverse proxy configuration will allow the virtual server to receive web requests from BBB users and pass them securely through to the right Docker container.
Create a suitable configuration file - at the OERF we use the convention of calling our configuration
sudo $EDIT /etc/nginx/sites-available/$SITE
In this file, you'll past in the following, replacing [Domain] as appropriate - now might be a good idea to try out search and replace in your text editor!
Update 2021-12-30 With the release of BBB 2.4 a few weeks ago, the Docker configuration now has one 'breaking' change: the port has been changed to 48087! So, if you are installing an older version of BBB, the previous default was port 8080. If you get a 502 error after setting up your containers, check to make sure you haven't been bitten by this little detail!
Right - back to the process...
After creating it, we have to 'enable' the configuration:
sudo ln -sf /etc/nginx/sites-available/$SITE /etc/nginx/sites-enabled/
It's also not a bad idea to disable the Nginx default configuration, as it can sometimes interfere with things:
sudo rm /etc/nginx/sites-enabled/default
Extra security with dhparam.pem
We're going to create a 'dhparam' certificate for your configuration. These take a long time to generate - between 10-30 minutes, depending not on the speed of your computer, but on the rate at which it creates 'random events' that allow it to create a suitablely complex random prime number.
sudo openssl dhparam -out /etc/ssl/certs/dhparam.pem 2048
If your time isn't limited, you can increase the size of your dhparam from 2048 to 4096 - it'll take quite a lot longer to create.
Ok - now that we've created our dhparam.pem, referenced in our Nginx configuration for [Domain], we should have everything in place. We can now test Nginx's configuration:
sudo nginx -t
If you don't get any errors or warnings, you can activate the new configuration:
sudo service nginx reload
You server should now successfully respond to your [Domain], but it'll redirect to HTTPS using the default (self-signed) certificates that are valid as far as Nginx is concerned, but your browser won't let you access the page due to those inappropriate certificates. You can test it by putting http://[Domain] into your browser and seeing if it redirects you to https://[Domain] and a 'bad certificate` (or similar) page.
To fix that, we can now generate a Let's Encrypt certificate which will be valid.
sudo letsencrypt certonly --webroot -w /var/www/letsencrypt -d ${SITE}
Since this is your first time running the letsencrypt script, you'll be asked for a contact email (so the Let's Encrypt system can warn you if your certificates are going to be expiring soon!) - use your [Admin email] for this. You can also opt in to allowing them to get anonymous statistics from your site.
Once you've done that, the Let's Encrypt system will verify that you (the person requesting the certificate) also controls the server that's requesting it (using the details specified in the /etc/nginx/includes/letsencrypt.conf file, along with data that the letsencrypt script writes into a special file in the /var/www/letsencrypt directory) and, all going well, you'll see a "Congratulations!" message telling you that you have new certificates for your [Domain].
Now is a good time to check if your renew-hook worked properly - there should now be two files in /etc/coturn-ssl, namely fullchain.pem and privkey.pem. If that's not the case, something might have gone wrong.
Then you can re-edit your Nginx confguration file:
sudo $EDIT /etc/nginx/sites-available/$SITE
and comment out the default certificates and uncomment the [Domain]-specific certificates, like this (we'll assume you've already got your [Domain] substituted!):
Once you've got that going, you again check to make sure your Nginx config is valid:
sudo nginx -t
and apply your configruation changes:
sudo service nginx reload
If you now go to http://[Domain] in your browser, you should be redirected to https://[Domain] and you shouldn't get any certificate errors, although you might get a "502" error because the service that reverse proxy configuration is trying to send you to doesn't yet exist! That's what we're expecting.
One more thing - we need to make sure that the coturn.sh renewal hook script has run. We can check to make sure that there are two files, fullchain.pem and privkey.pem in the /etc/coturn-ssl directory. If we start the Docker containers before these files exist, the Docker daemon creates them as directories by default which can lead to all sorts of trickiness. Run
sudo ls -l /etc/coturn-ssl/
and make sure you get a result like this:
Install Docker
Now we have to set up the Docker container support by first registering a new package source...
sudo apt-get install -y apt-transport-https curl gnupg lsb-release
sudo curl -fsSL https://download.docker.com/linux/ubuntu/gpg | sudo gpg --dearmor -o /usr/share/keyrings/docker-archive-keyring.gpg
sudo echo "deb [arch=$(dpkg --print-architecture) signed-by=/usr/share/keyrings/docker-archive-keyring.gpg] https://download.docker.com/linux/ubuntu $(lsb_release -cs) stable" | sudo tee /etc/apt/sources.list.d/docker.list > /dev/null
updating our list of available packages to include the Docker-related packages...
sudo apt-get update
and then install them:
sudo apt-get install -y docker-ce docker-ce-cli containerd.io
Which installs a bunch of dependencies as well.
To make sure that our non-root user can talk to the Docker server, we need to jump through a couple more hoops:
sudo addgroup docker
sudo adduser dave docker
After doing this, the easiest thing is to log out and log back in again to make sure my user can access the new permissions. To confirm that my user has docker group privileges, I can run
id
which should give a result like
uid=1000(dave) gid=1000(dave) groups=1000(dave),4(adm),27(sudo),1001(docker)
with the latter being the confirmation.
Install Docker-compose
Now we're almost to the BigBlueButton part - we just need to install the Docker Compose framework:
sudo apt install python3-pip
sudo pip install -U pip
sudo pip install -U docker-compose
Once you've done that, you should be able to run docker-compose at your command prompt and it should give you the docker-compose help page. If so, great work! Almost there.
Git-Clone BBB Docker repository
Now it's time to install the set of Docker containers that make up the BigBlueButton stack of coordinated services.
We make a place for the docker configuration and data to live:
sudo mkdir -p /home/docker/
go into it
cd /home/docker
and then we use the magic of 'git' (if you don't know it, this is one of the single most powerful tools programmers use - everyone would benefit from knowing how 'version control' works - git is by far the most widely used version control aka 'source code control' system in the world. It's open source.) to 'clone' the BigBlueButton developers' Docker definitions code:
sudo git clone -b main --recurse-submodules https://github.com/bigbluebutton/docker.git bbb-docker
That command puts all the code into a directory called bbb-docker so let's go there:
cd bbb-docker
and in there, we run this command to gram a second layer of code that is referenced by the first layer we already downloaded in the previous step:
sudo git submodule update --init
Finally, we run this handy script provided by the BBB developers to set up a working Docker Compose configuration:
sudo ./scripts/setup
This will script will ask you some questions about your system. These are the questions and the answers we'll use - note, where I've written [IPv4] and [IPv6] below, you should see the actual IPv4 and IPv6 addresses for your server:
Once you finish answering these questions, the script creates a file called .env (the leading '.' means it's a 'hidden' file that won't show up in normal directory listings - you have to know it's there, as it holds important system values and shouldn't be deleted.
Configure your BBB
But now, we're going to tweak it, because it holds all the important customised values we need to configure our BigBlueButton service.
sudo $EDIT .env
When you're editing the file, scroll down through it and adjust the values you find as follows.
Uncomment this one
Set the following
and finally set
This last one makes it possible for you to invite external people to make use of your BigBlueButton instance - they can create a log in and create their own rooms over which they'll have some control. These can be people in your organisation or community for whom you want your BBB to be available as a resource.
Fix minor configuration error that blocks JODConverter
One of the containers used in the BBB stack is called JODConverter which, in standard Free and Open Source Software tradition, makes use of an 'upstream' development by another developer, EugenMayer, which in turn makes use of an upstream development...
The issue is that a recent update (in early December 2021) has broken the process of launching this container. This is a big problem because the JODConverter provides the services of converting uploaded presentations and downloaded documents (like BBB's Public Chat or Shared Notes) in various useful file formats.
Turns out the fix is easy. While still in bbb-docker, Just run
sudo $EDIT mod/jodconverter/Dockerfile
and add the following line to the very bottom of the file:
CMD ["--spring.config.additional-location=optional:/etc/app/"]
Save it, and you're done. I have submitted an issue with the fix I've found to the bigbluebutton/docker project.
Once that configuration is done, it's finally time to...
Build your BBB
The first time it's run, this command will trigger the building of a set of no less than 22 separate Docker containers, each running its own crucial service as part of the BigBlueButton stack.
sudo docker-compose up -d
Note: this process can take a LONG time, like an hour or more depending on your server's internet connection speed.
If you want to see how long it takes the first time, run this instead:
sudo time docker-compose up -d
which will give you a readout of the time the command takes to complete.
Visit your new BBB
Once you next see the command prompt ($ or #), it means that your BBB system is starting up. You can see the status of the containers by running
sudo docker-compose ps
which should give you something that looks like this, once everything is running (it might take a few minutes!):
At that point, you can visit https://[Domain] and instead of a 502 error, you should see the BigBlueButton 'Greenlight' front page.
Now the final step...
Create an admin user:
To create an admin user, you run this:
sudo docker-compose exec greenlight bundle exec rake admin:create
It will give you a login email address and a randomly generated password. Use these to log in. In the profile (top right Admin menu dropdown), you can alter the admin user's email to a real email (perhaps [Admin email]?), and change the password if you like.
Then you can go back to the Admin menu and select "Organisation" which should put you on the Manage Users page. You then invite yourself to join as a user by sending yourself an email (which, if your SMTP settings are correct, will work). If you don't receive it in a minute or two, check your spam folder.
Either log out of Greenlight before clicking the link in the email or open the link (by copying and pasting it) in a different browser where you're not logged in to this Greenlight instance, and create a user account for yourself.
Then log back into Greenlight as the Admin user (if you've previously logged out) and refresh the "Manage Users" page. You should find your newly created user. Select 'Edit' from the vertical 3 dotted menu. On the "Update your Account Info" page, set the User Role for your user to 'Admin" and click the "Update" button. You should now be able to log out as Admin, and back in as your own user, but with administrative privileges.
Run your first conference
Now it's time to try running a video conference. Click on the "Home" link (top right menu) and you should see that you have a default room called "Home Room" with a URL specified in the form [Domain]/b/[first 3 letters of your name]-[3 random hex digits]-[3 more random hex digits]. For me, it might look something like this: https://[Domain]/b/dav-a5b-73z
Click "Start" to initiate a conference in that Home Room.
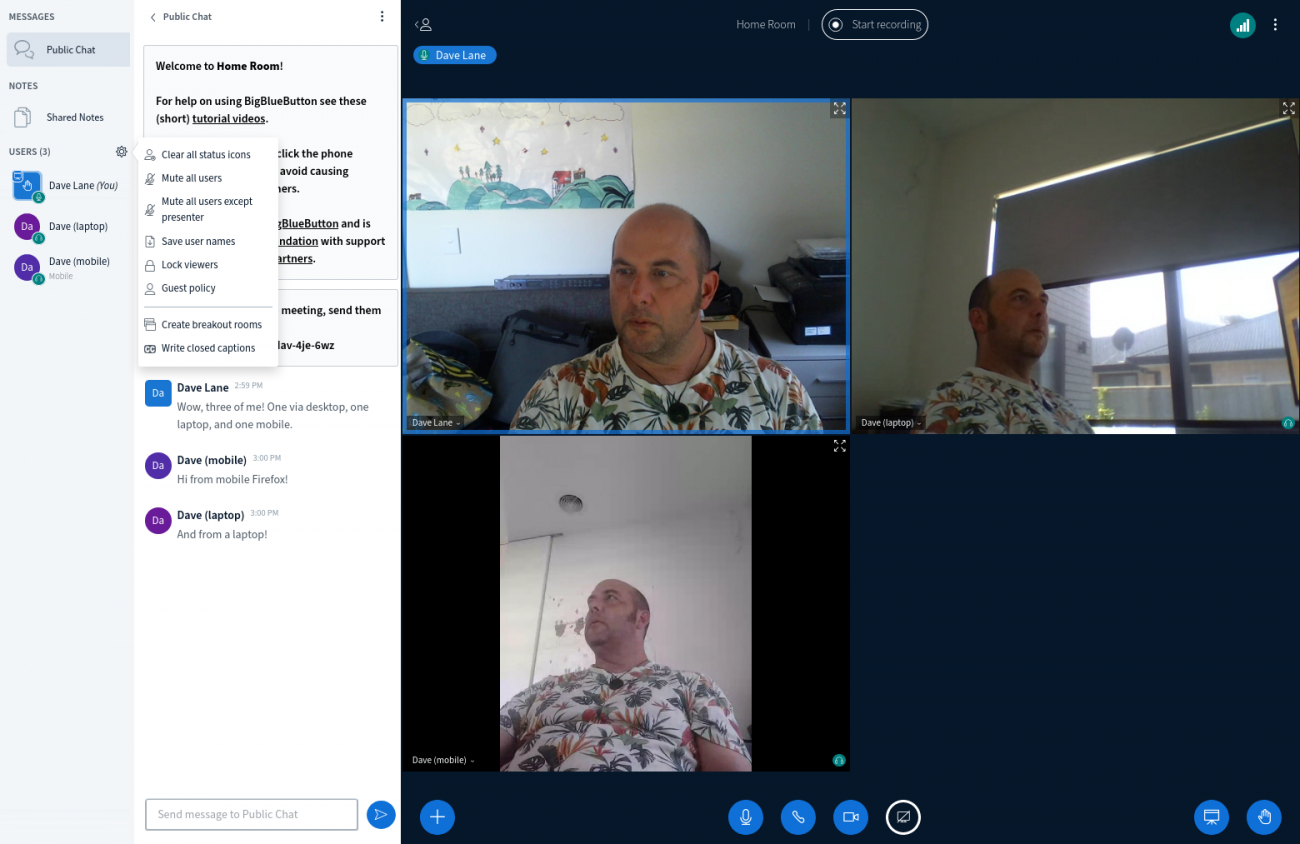
In the conference room, you should select 'Microphone' so you can test speaking and listening, and also test your video camera (assming you have access to both on the computing device you're using to access BBB - note, a modern cellphone normally offers all of these.
We always encourage people participating in video conferences (regardless of the technology) to employ headphones to separate the audio from the conference form their input. It greatly improves the audio quality for all involved!.
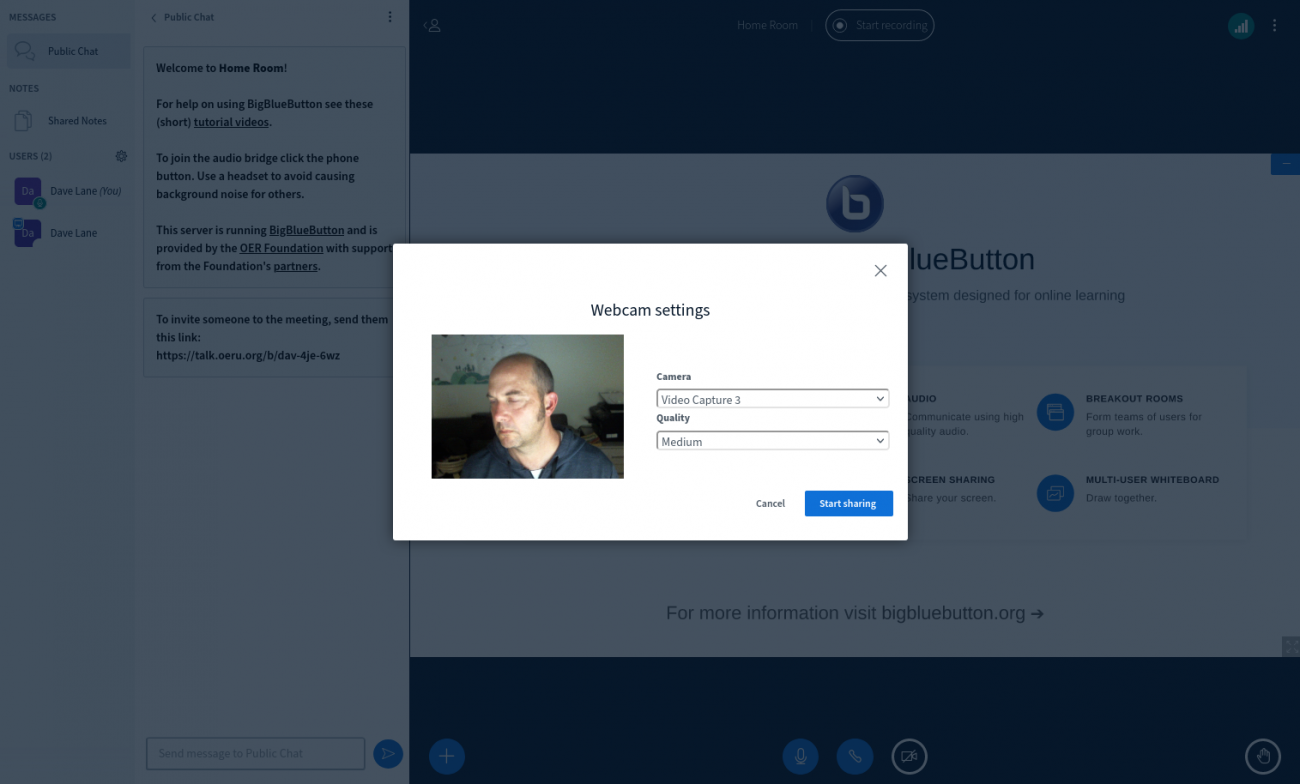
If you select 'Microphone', there will be a brief delay whil your browser negotiates with the COTURN server in your BBB stack to link your data and audio channels. Once it's done that, it will give you an "echo test" window (see included screen shots). You should speak into your microphone when you see that screen and check whether you can hear yourself. This will confirm that your audio settings are right (or not) and will help the BBB system adjust its echo cancellation algorithms.
You can then also clidk the 'camera' icon (bottom middle of the page) to activate your webcam if you have one (or choose one if you have multiple cameras) as well as the video quality.
You can also try to 'Start recording' if you want to test your ability to record a session. Note that there is a delay after the end of a session in which you've recorded before the recording is displayed on the 'room' page in Greenlight. It might take minutes or even hourse to generate depending on the power of your server and the length of the session.
To see other administrative functionality including moderation and breakout rooms, click on the "gear" icon next to the "Users" heading in the left hand column. You can also experiment with the "Public Chat" and the "Shared Notes". Both can be saved at any time (via the top right 3 dot menu in that section) and will be included in any recordings you make.
Note the contents of Public Chat and Shared Notes will be wiped at the end of a session unless you explicitly save them or record the session (at least briefly at the end).
You can provide that "room address" to anyone and they can join your room (via an modern browser) when you have a session running. Alternatively, you can click on the 3 dotted menu associated with your room below the 'Search for room" form, and change the default properties of your room, including configuring it to let anyone who knows the room's address start a session. You can also create additional rooms (as an Admin user, you can set the limits on many of these properties via Organisation in the top right menu under your user name.
Have fun with your new, world class, cost-effective, large-scale BigBlueButton video conferencing application!
Next Steps
In a future tutorial, we'll provide information on how to troubleshoot BBB issues, how to upgrade it as new versions are made available by developers, and how to ensure that your recordings, user database, and configuration are backed up incrementally, encrypted, in remote storage.
Blog comments
It says in the nginx-config…
It says in the nginx-config to change the port for the proxy and not forget to change it in the .env file. Where do I need to put what into the .env file for using a different port than 8080?
Hmm - thanks for pointing…
In reply to It says in the nginx-config… by LPup (not verified)
Hmm - thanks for pointing that out. Yes, I think I made an error with that instruction (I've updated the Nginx config). If you implement BBB today via this set of instructions, you'll be installing BBB 2.4 - port 8080 was used in 2.3 and earlier versions. For 2.4, use port 48087. To be honest, I'm not sure of the right way to alter it if you have to due to other services running on the same system. Writing it manually in the docker-compose.yml file will be overwritten the next time you do an update... It might be necessary to change the port specified in the relevant container's Dockerfile under mods...
Add new comment